

Prerequisites
- A running Keycloak server (self-hosted or cloud) with admin access to a realm
- Bifrost Enterprise deployed and accessible
- Your Bifrost callback URL:
https://<your-bifrost-domain>/login
Step 1: Create an OIDC Client
Open the Clients list
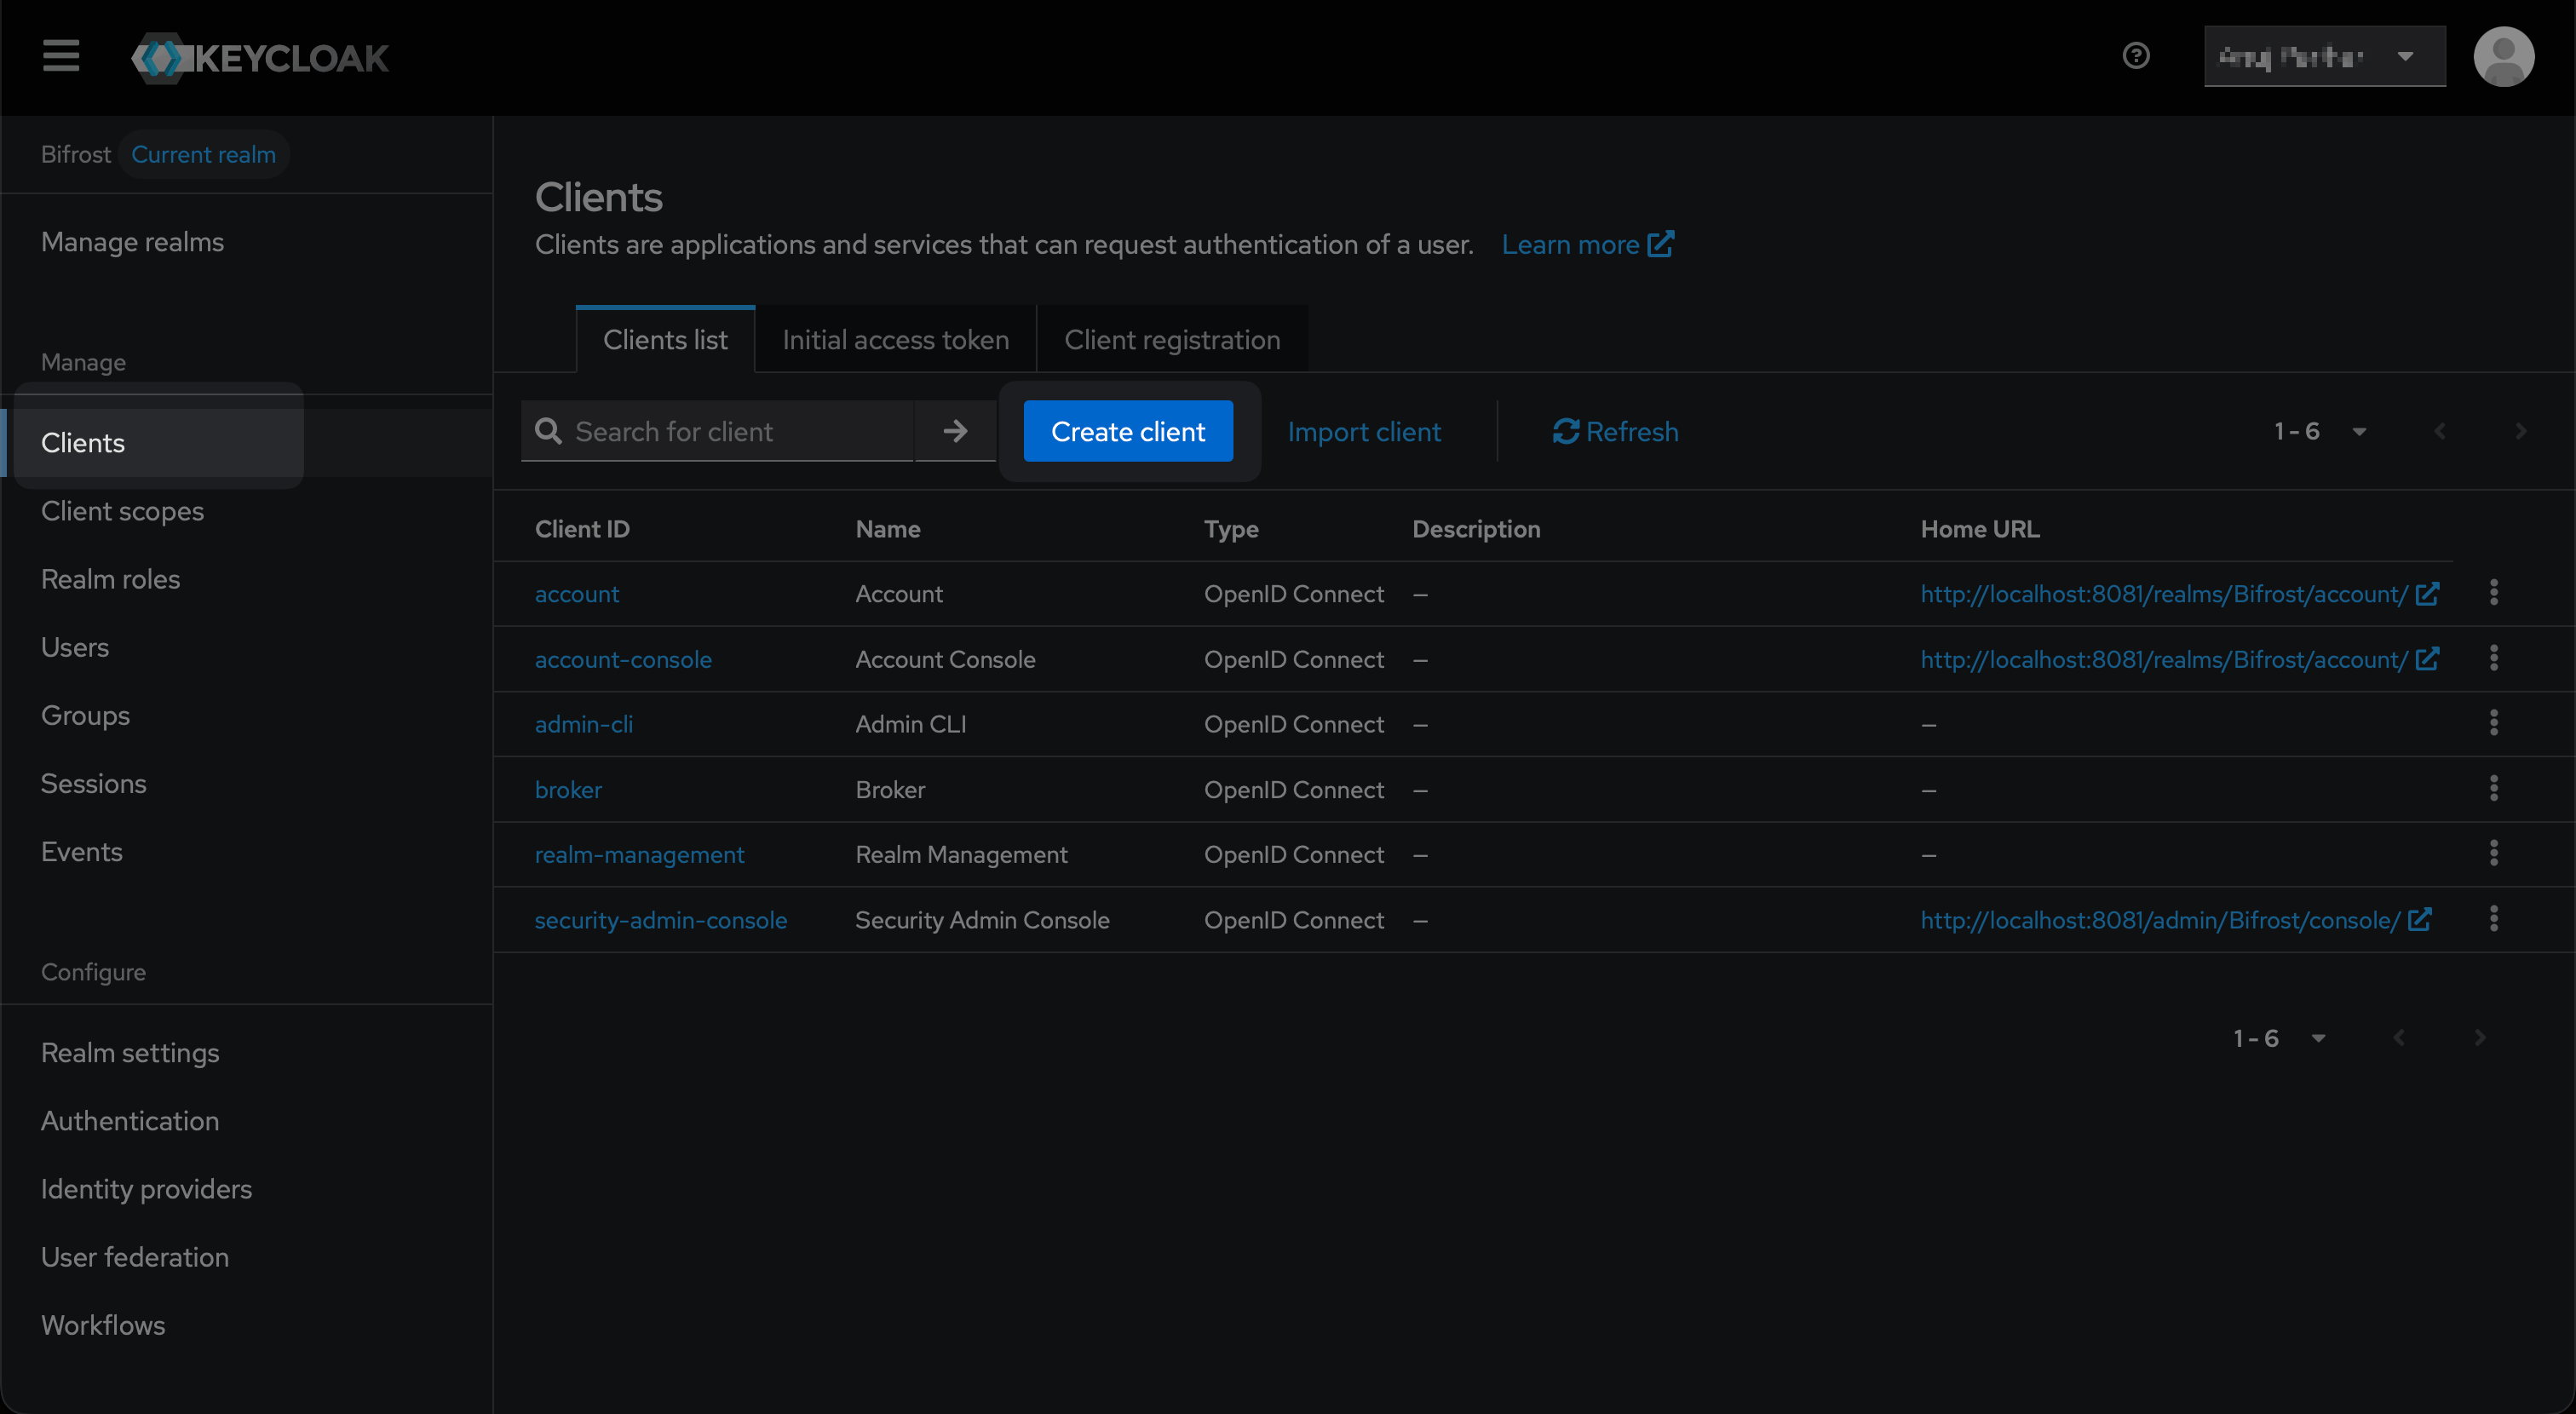
The Clients list - click Create client to start.
Fill in General settings
- Client type: OpenID Connect
- Client ID:
bifrost-oidc(or any identifier you prefer) - Name:
Bifrost
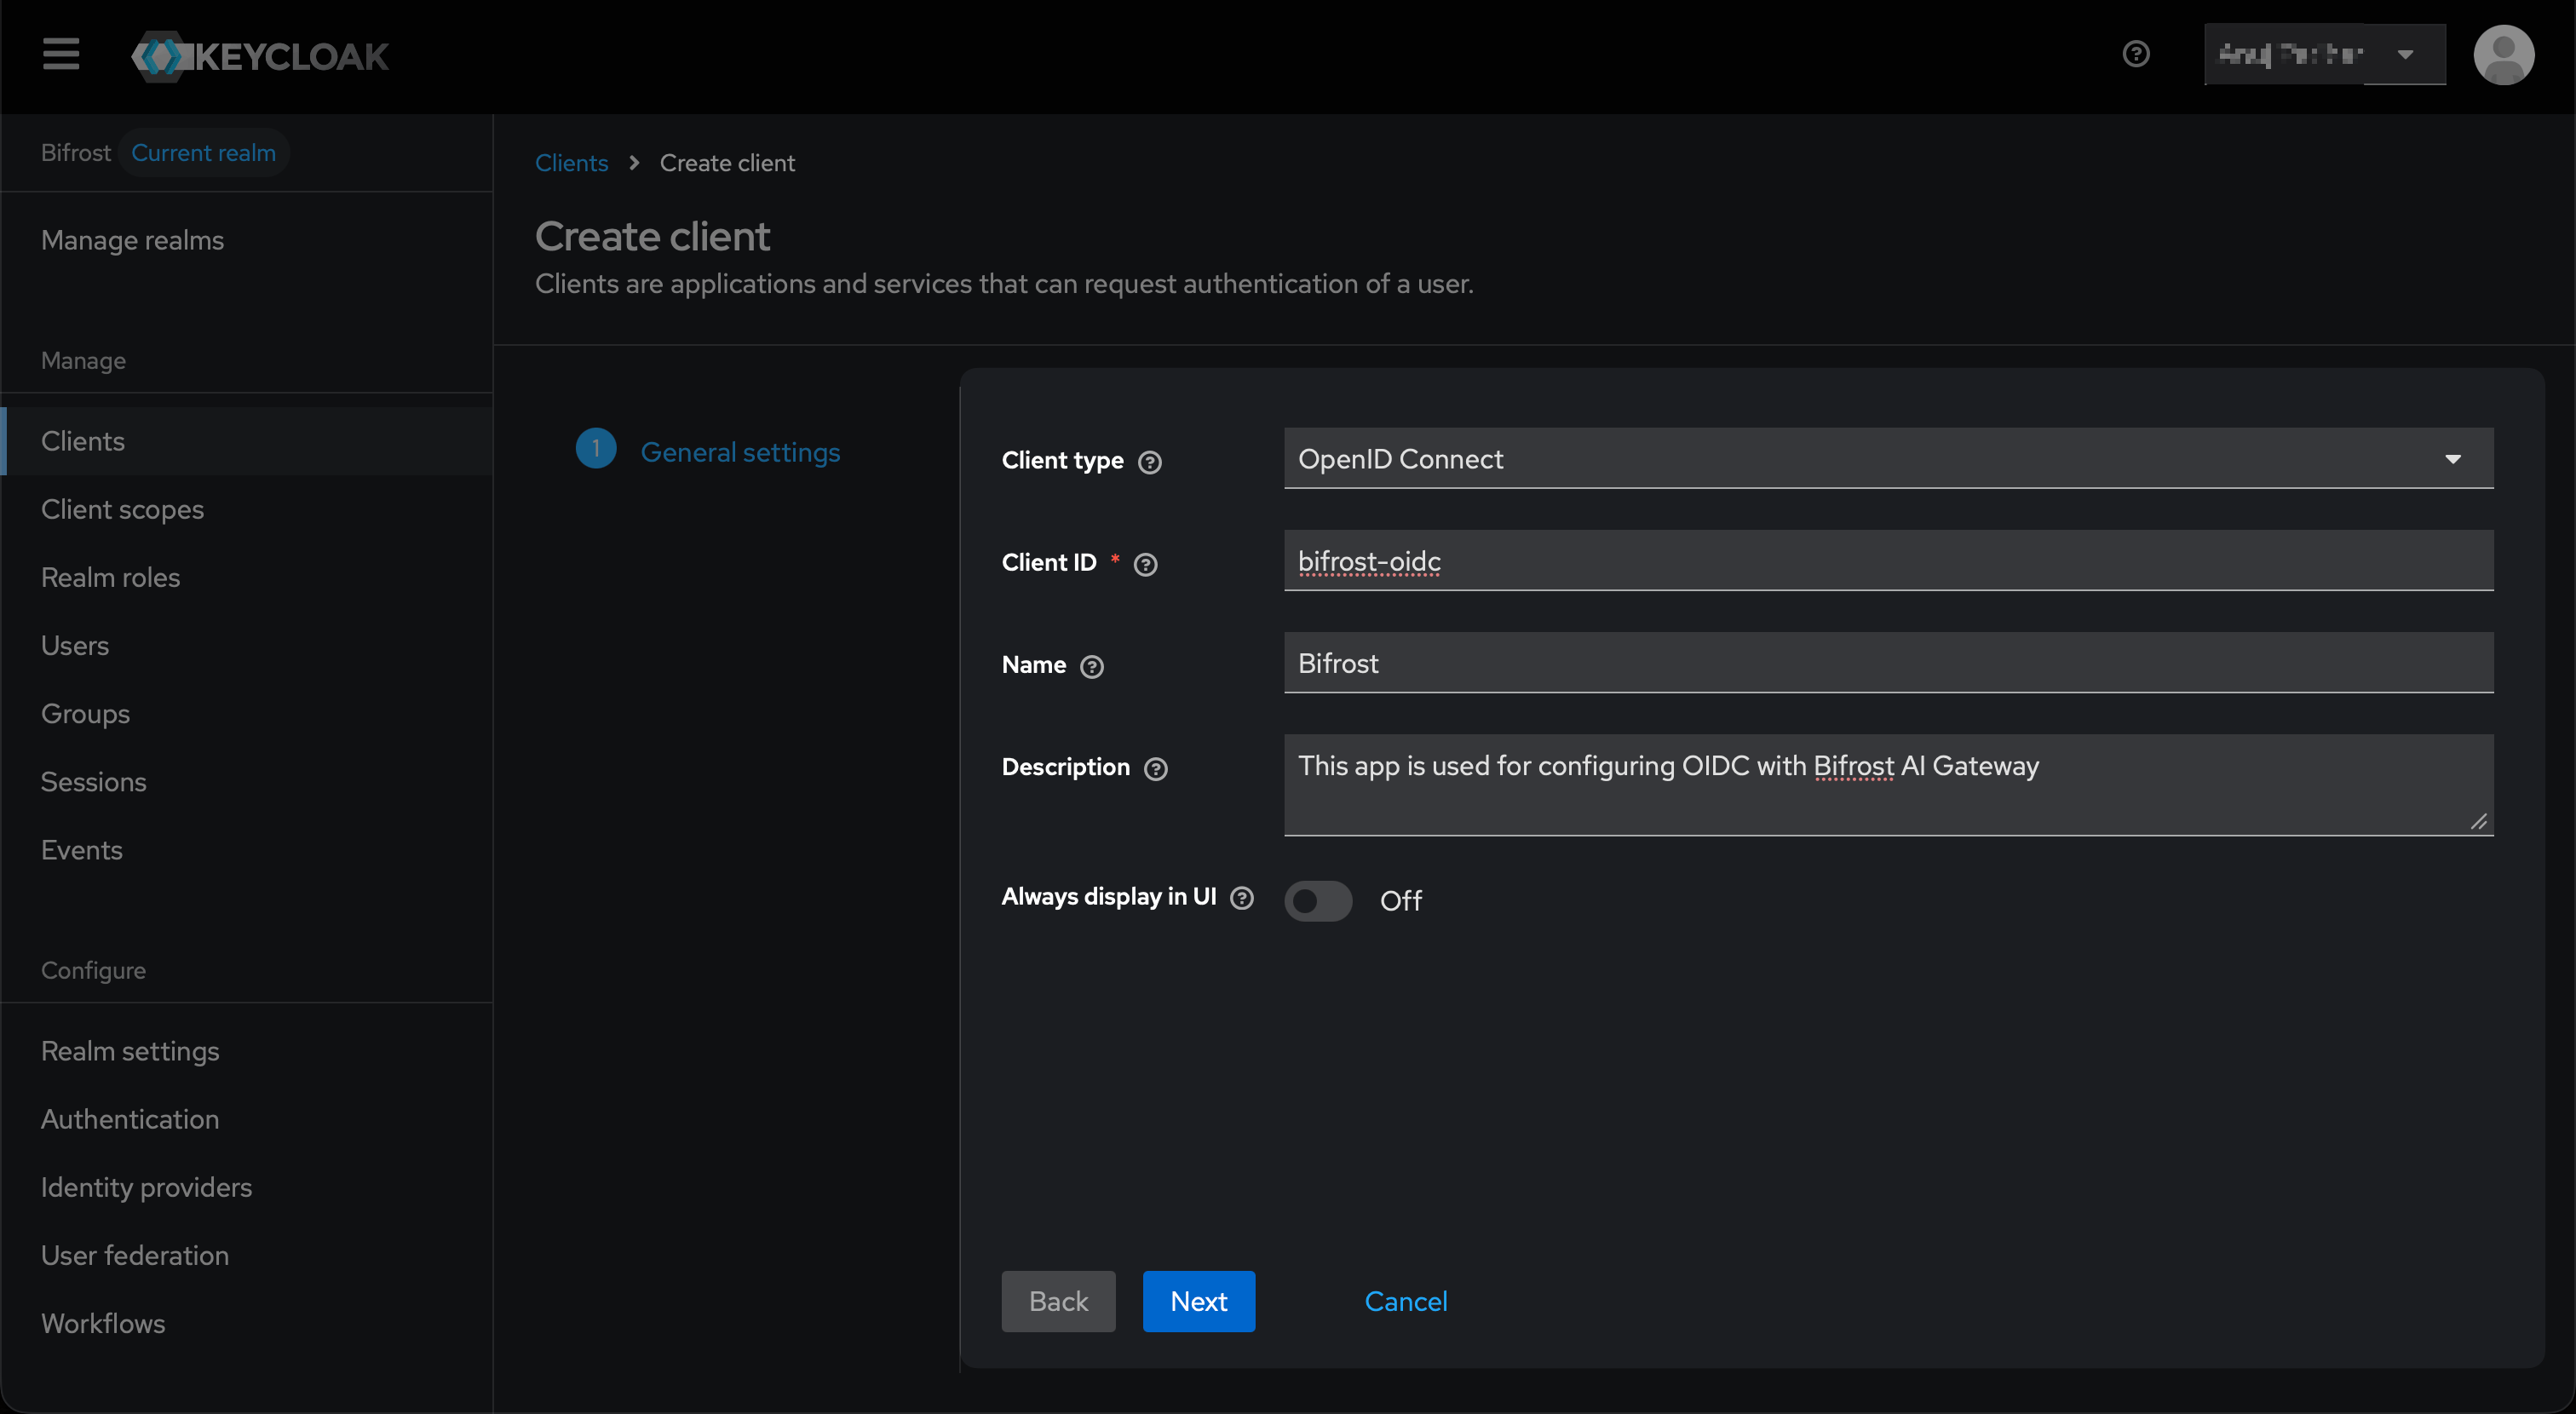
General settings - set Client type to OpenID Connect and provide a Client ID.
Configure Capability config
- Client authentication - makes this a confidential client and generates a client secret
- Standard flow - enables Authorization Code login
- Service accounts roles - required for Bifrost to call the Keycloak Admin REST API for background user sync
Configure Login settings
- Root URL:
https://<your-bifrost-domain> - Valid redirect URIs:
https://<your-bifrost-domain>/login
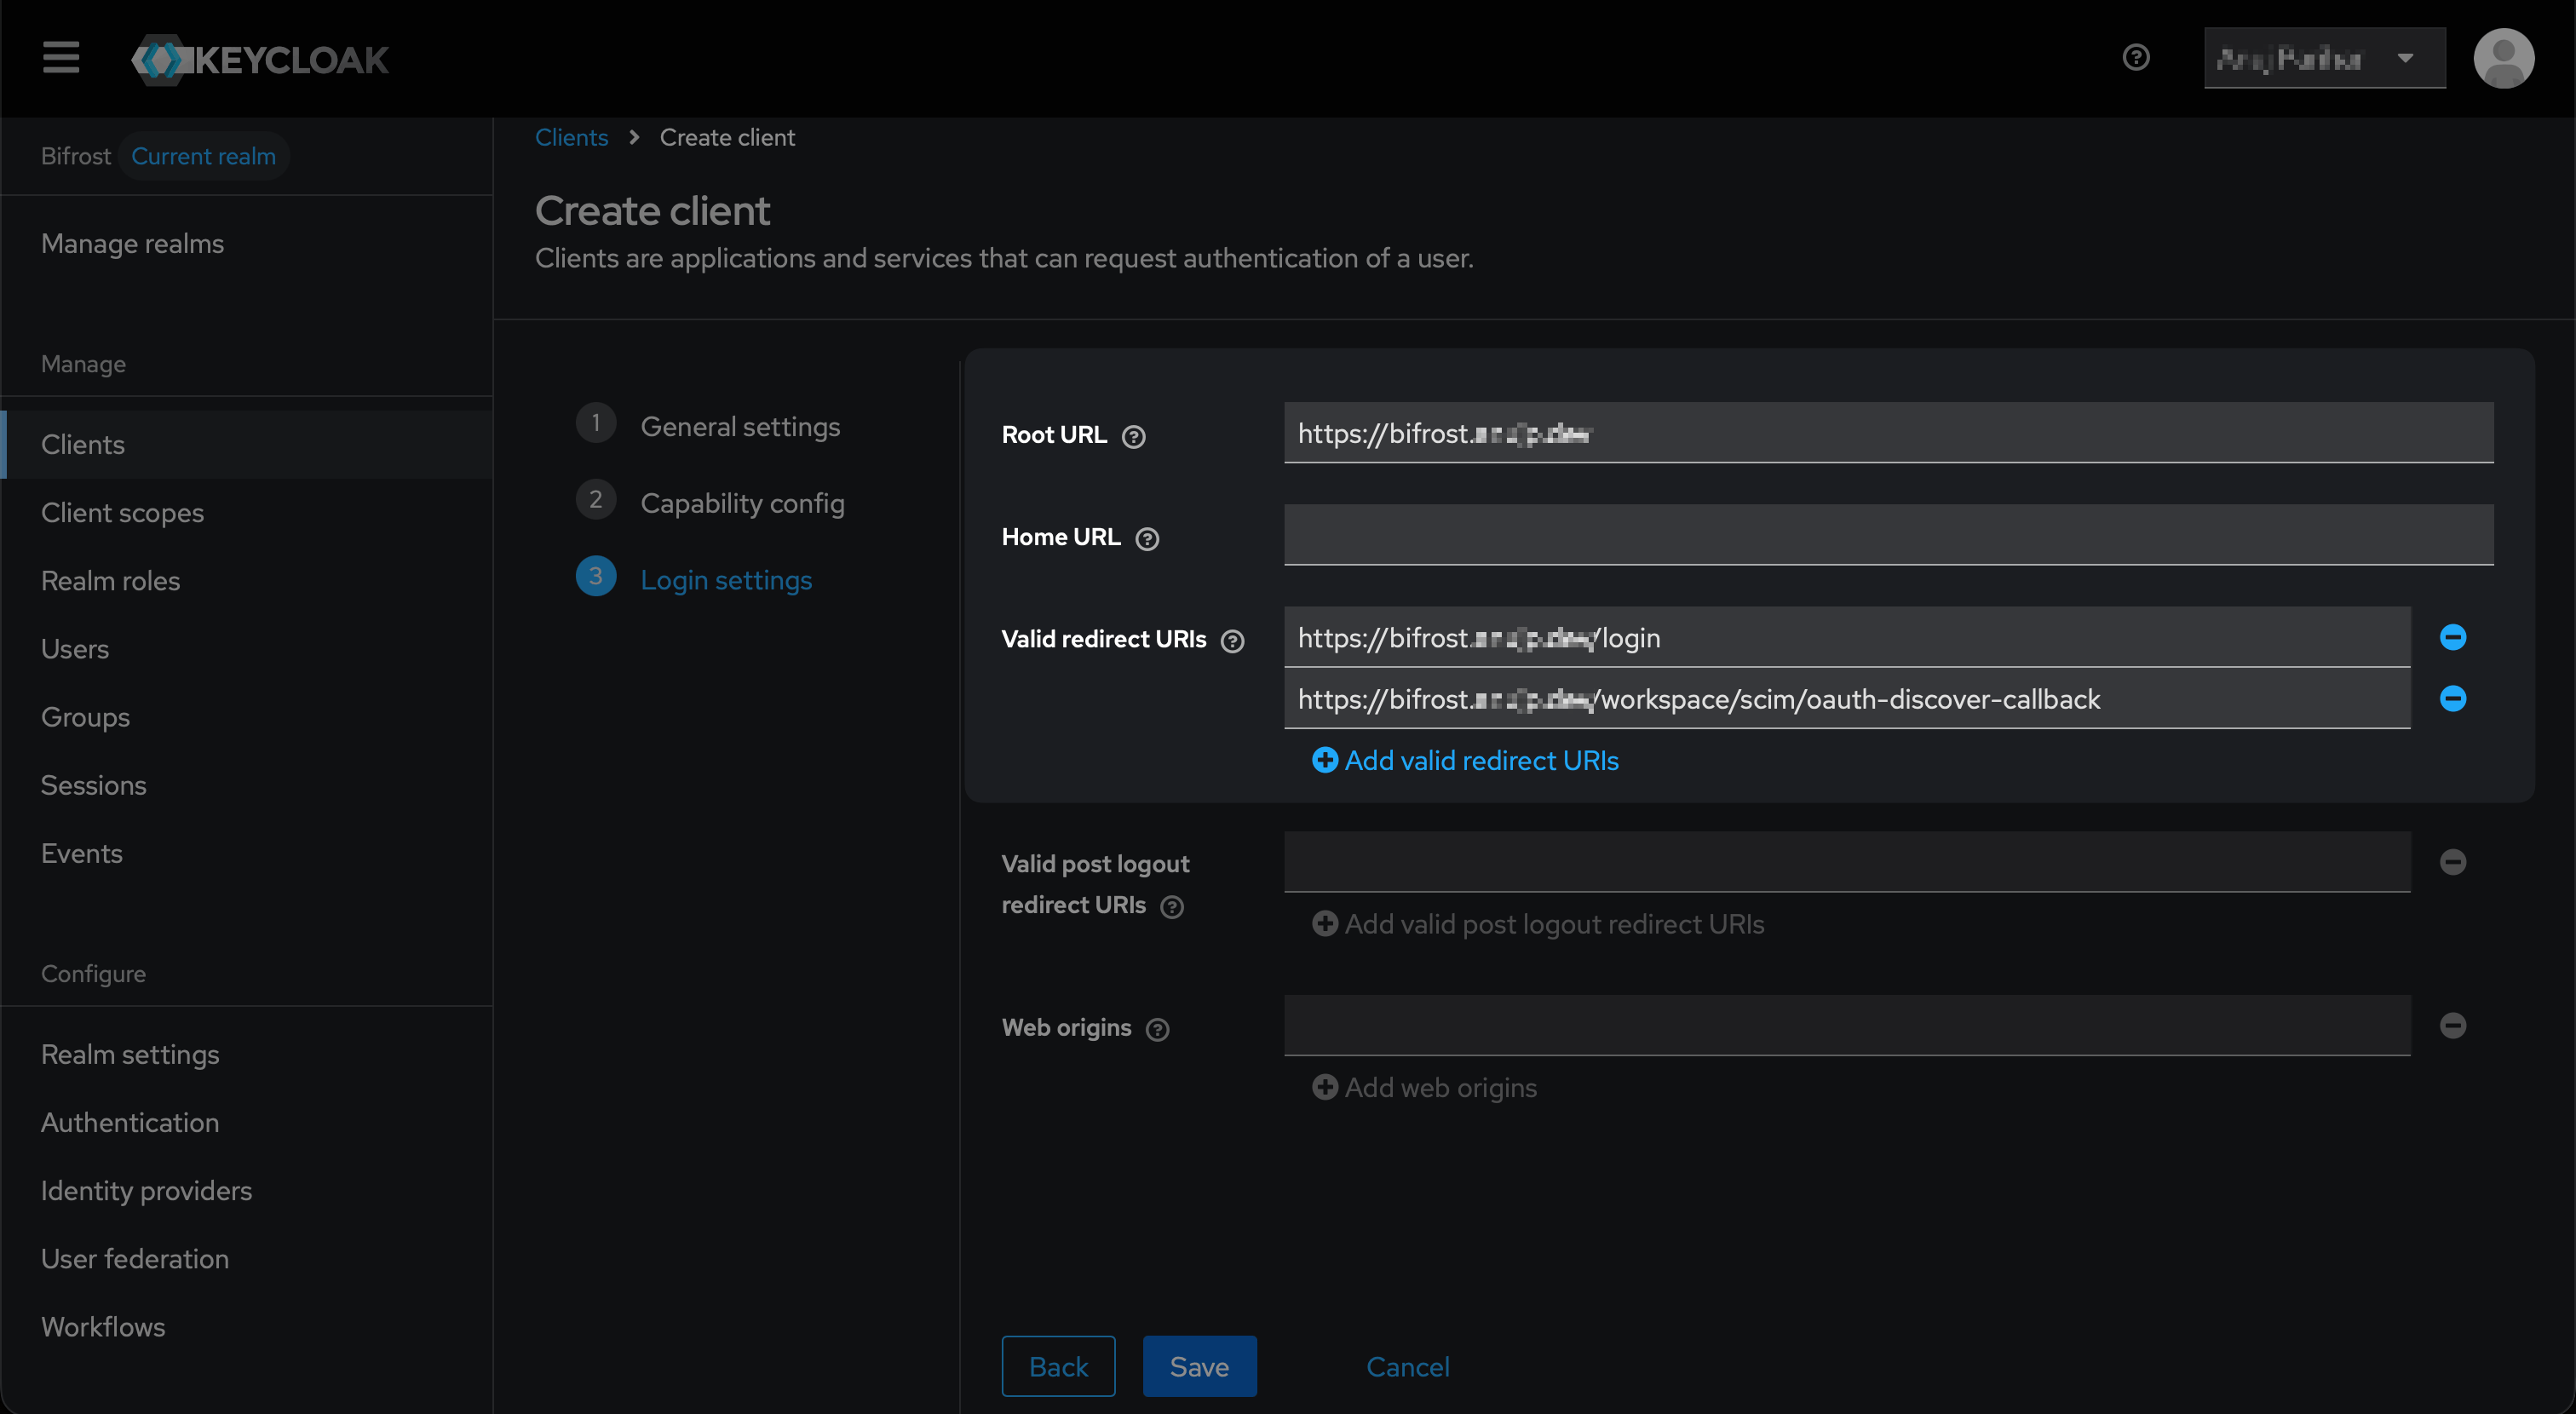
Login settings - add your Bifrost login URL and optionally the Discover Claims callback URI.
Grant Admin REST API permissions to the service account
realm-management, and assign:Step 2: Copy Your Client Secret
Open the Credentials tab
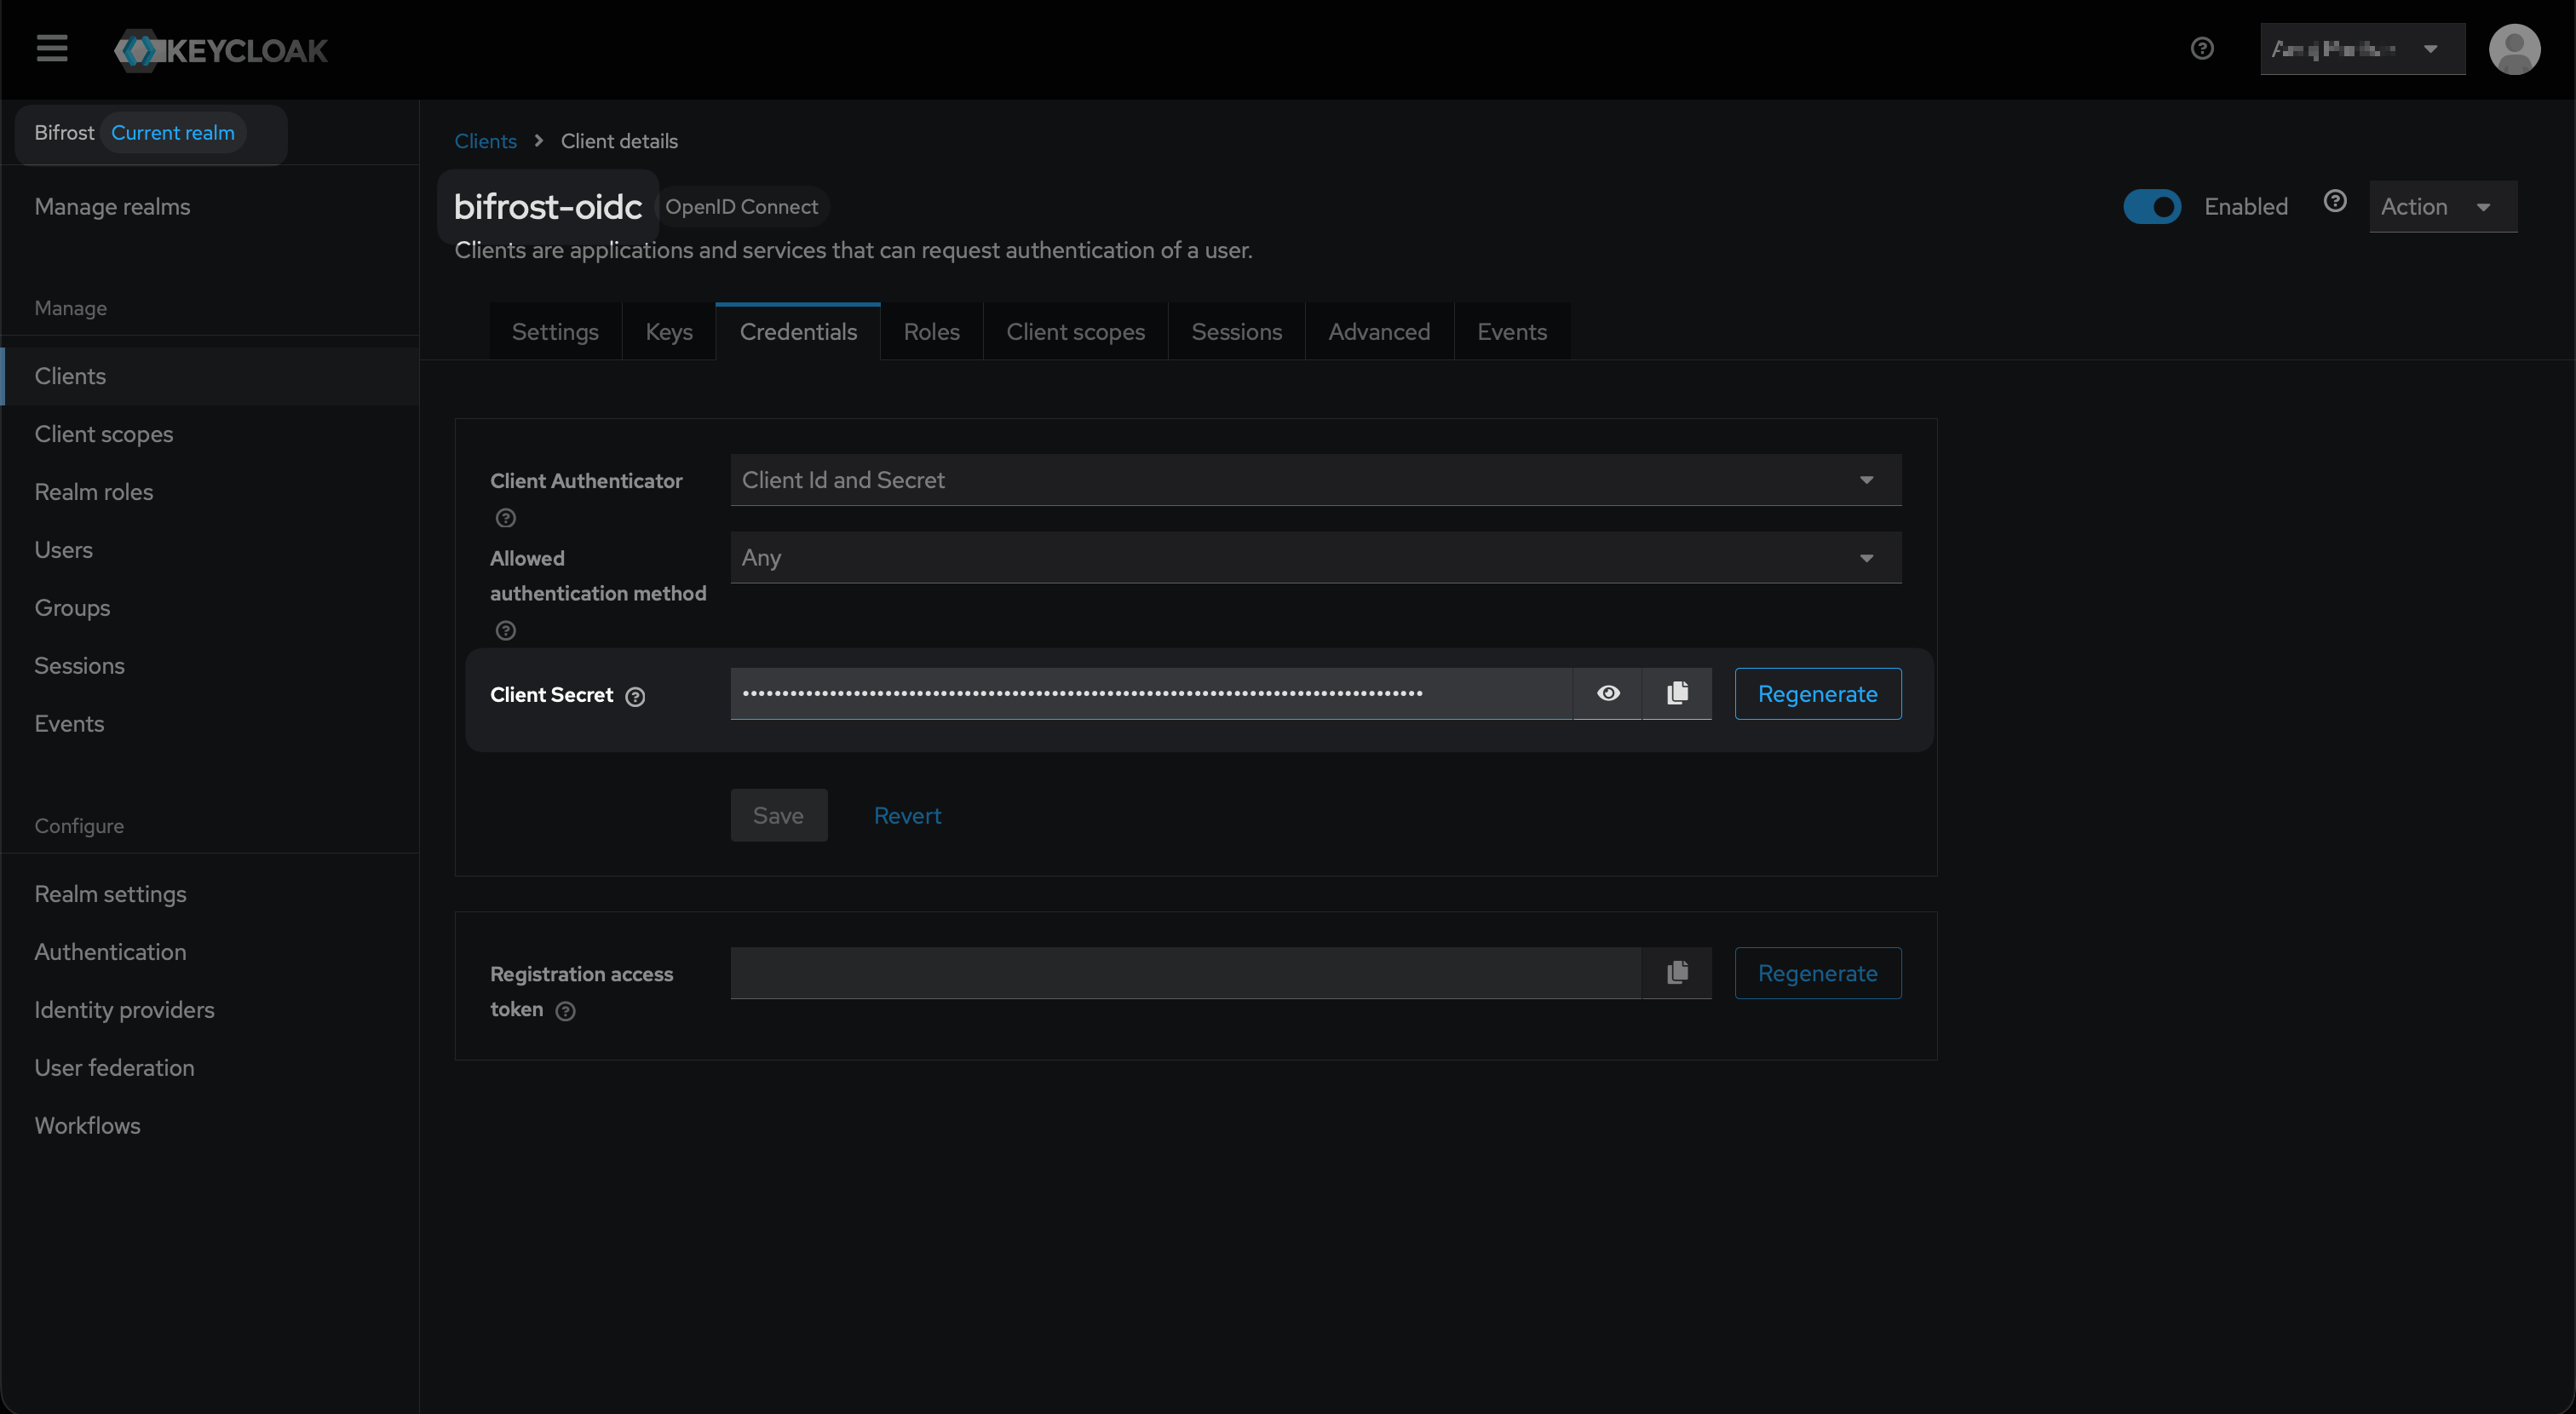
Credentials tab - copy the Client Secret.
Step 3: Configure Claim Mappers
Keycloak does not include realm roles or full group paths in tokens by default. Add two mappers to the client’s dedicated scope.Open the dedicated scope
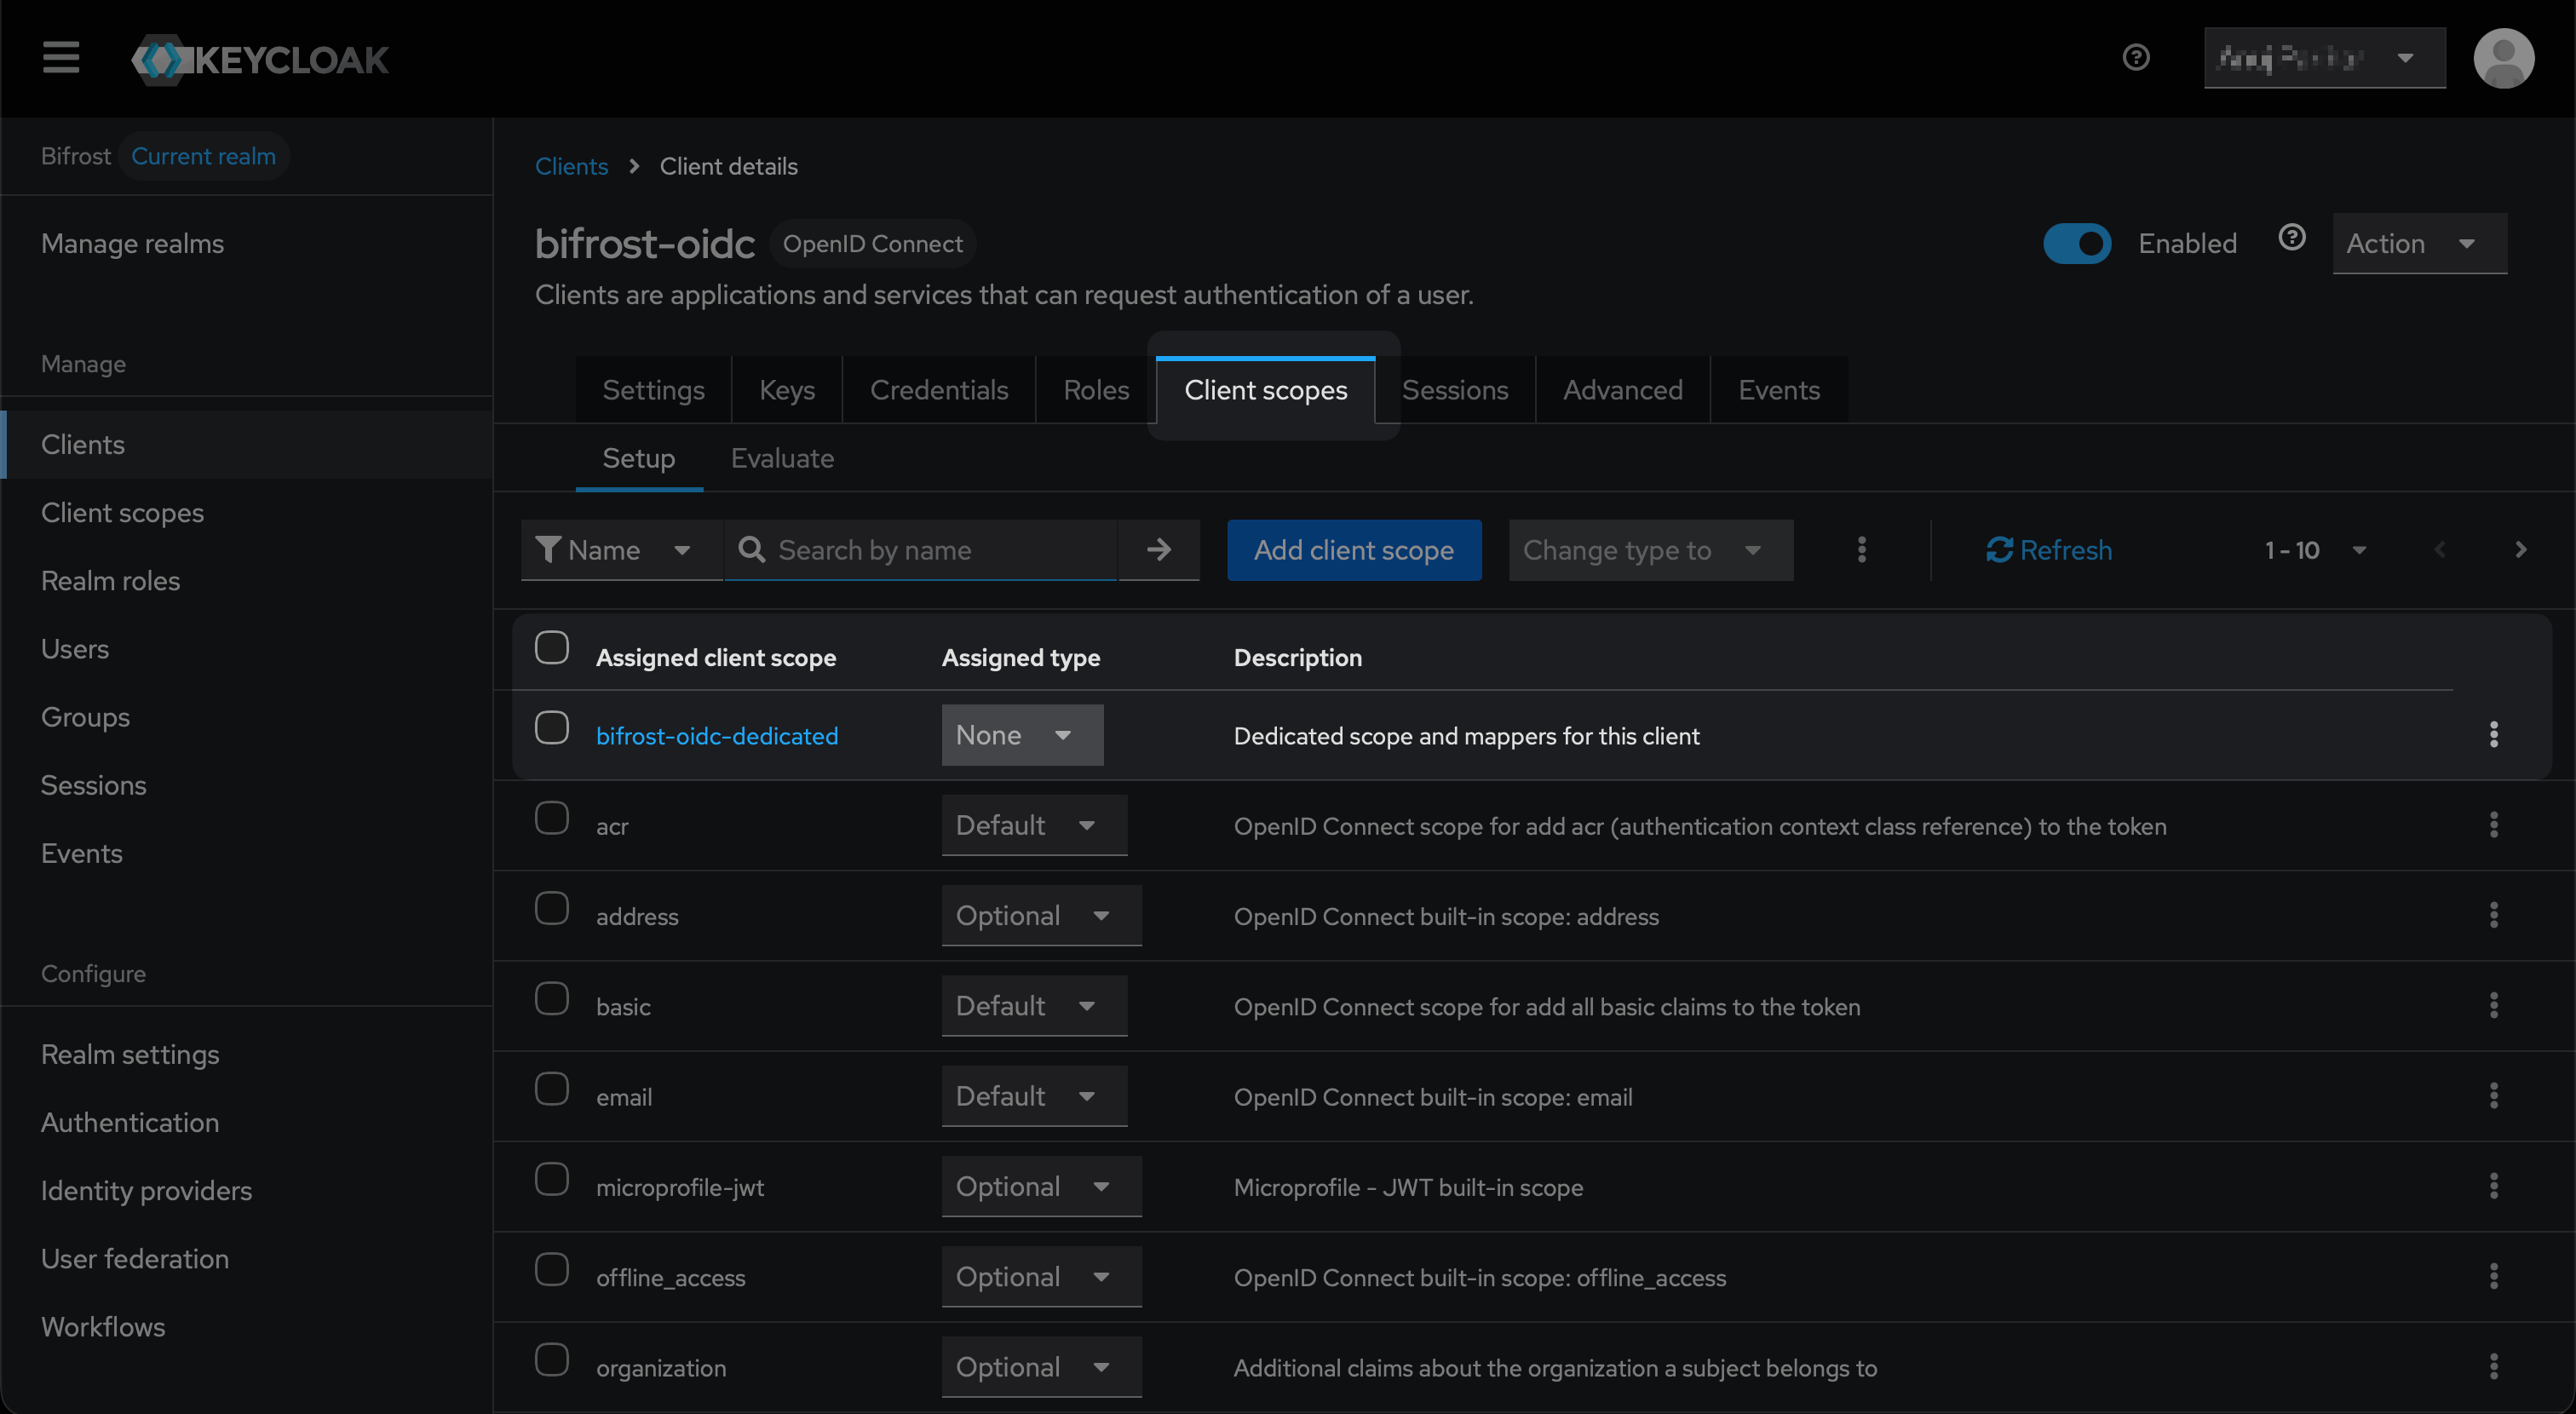
Client scopes tab - open the dedicated scope to add mappers.
Add the Group Membership mapper
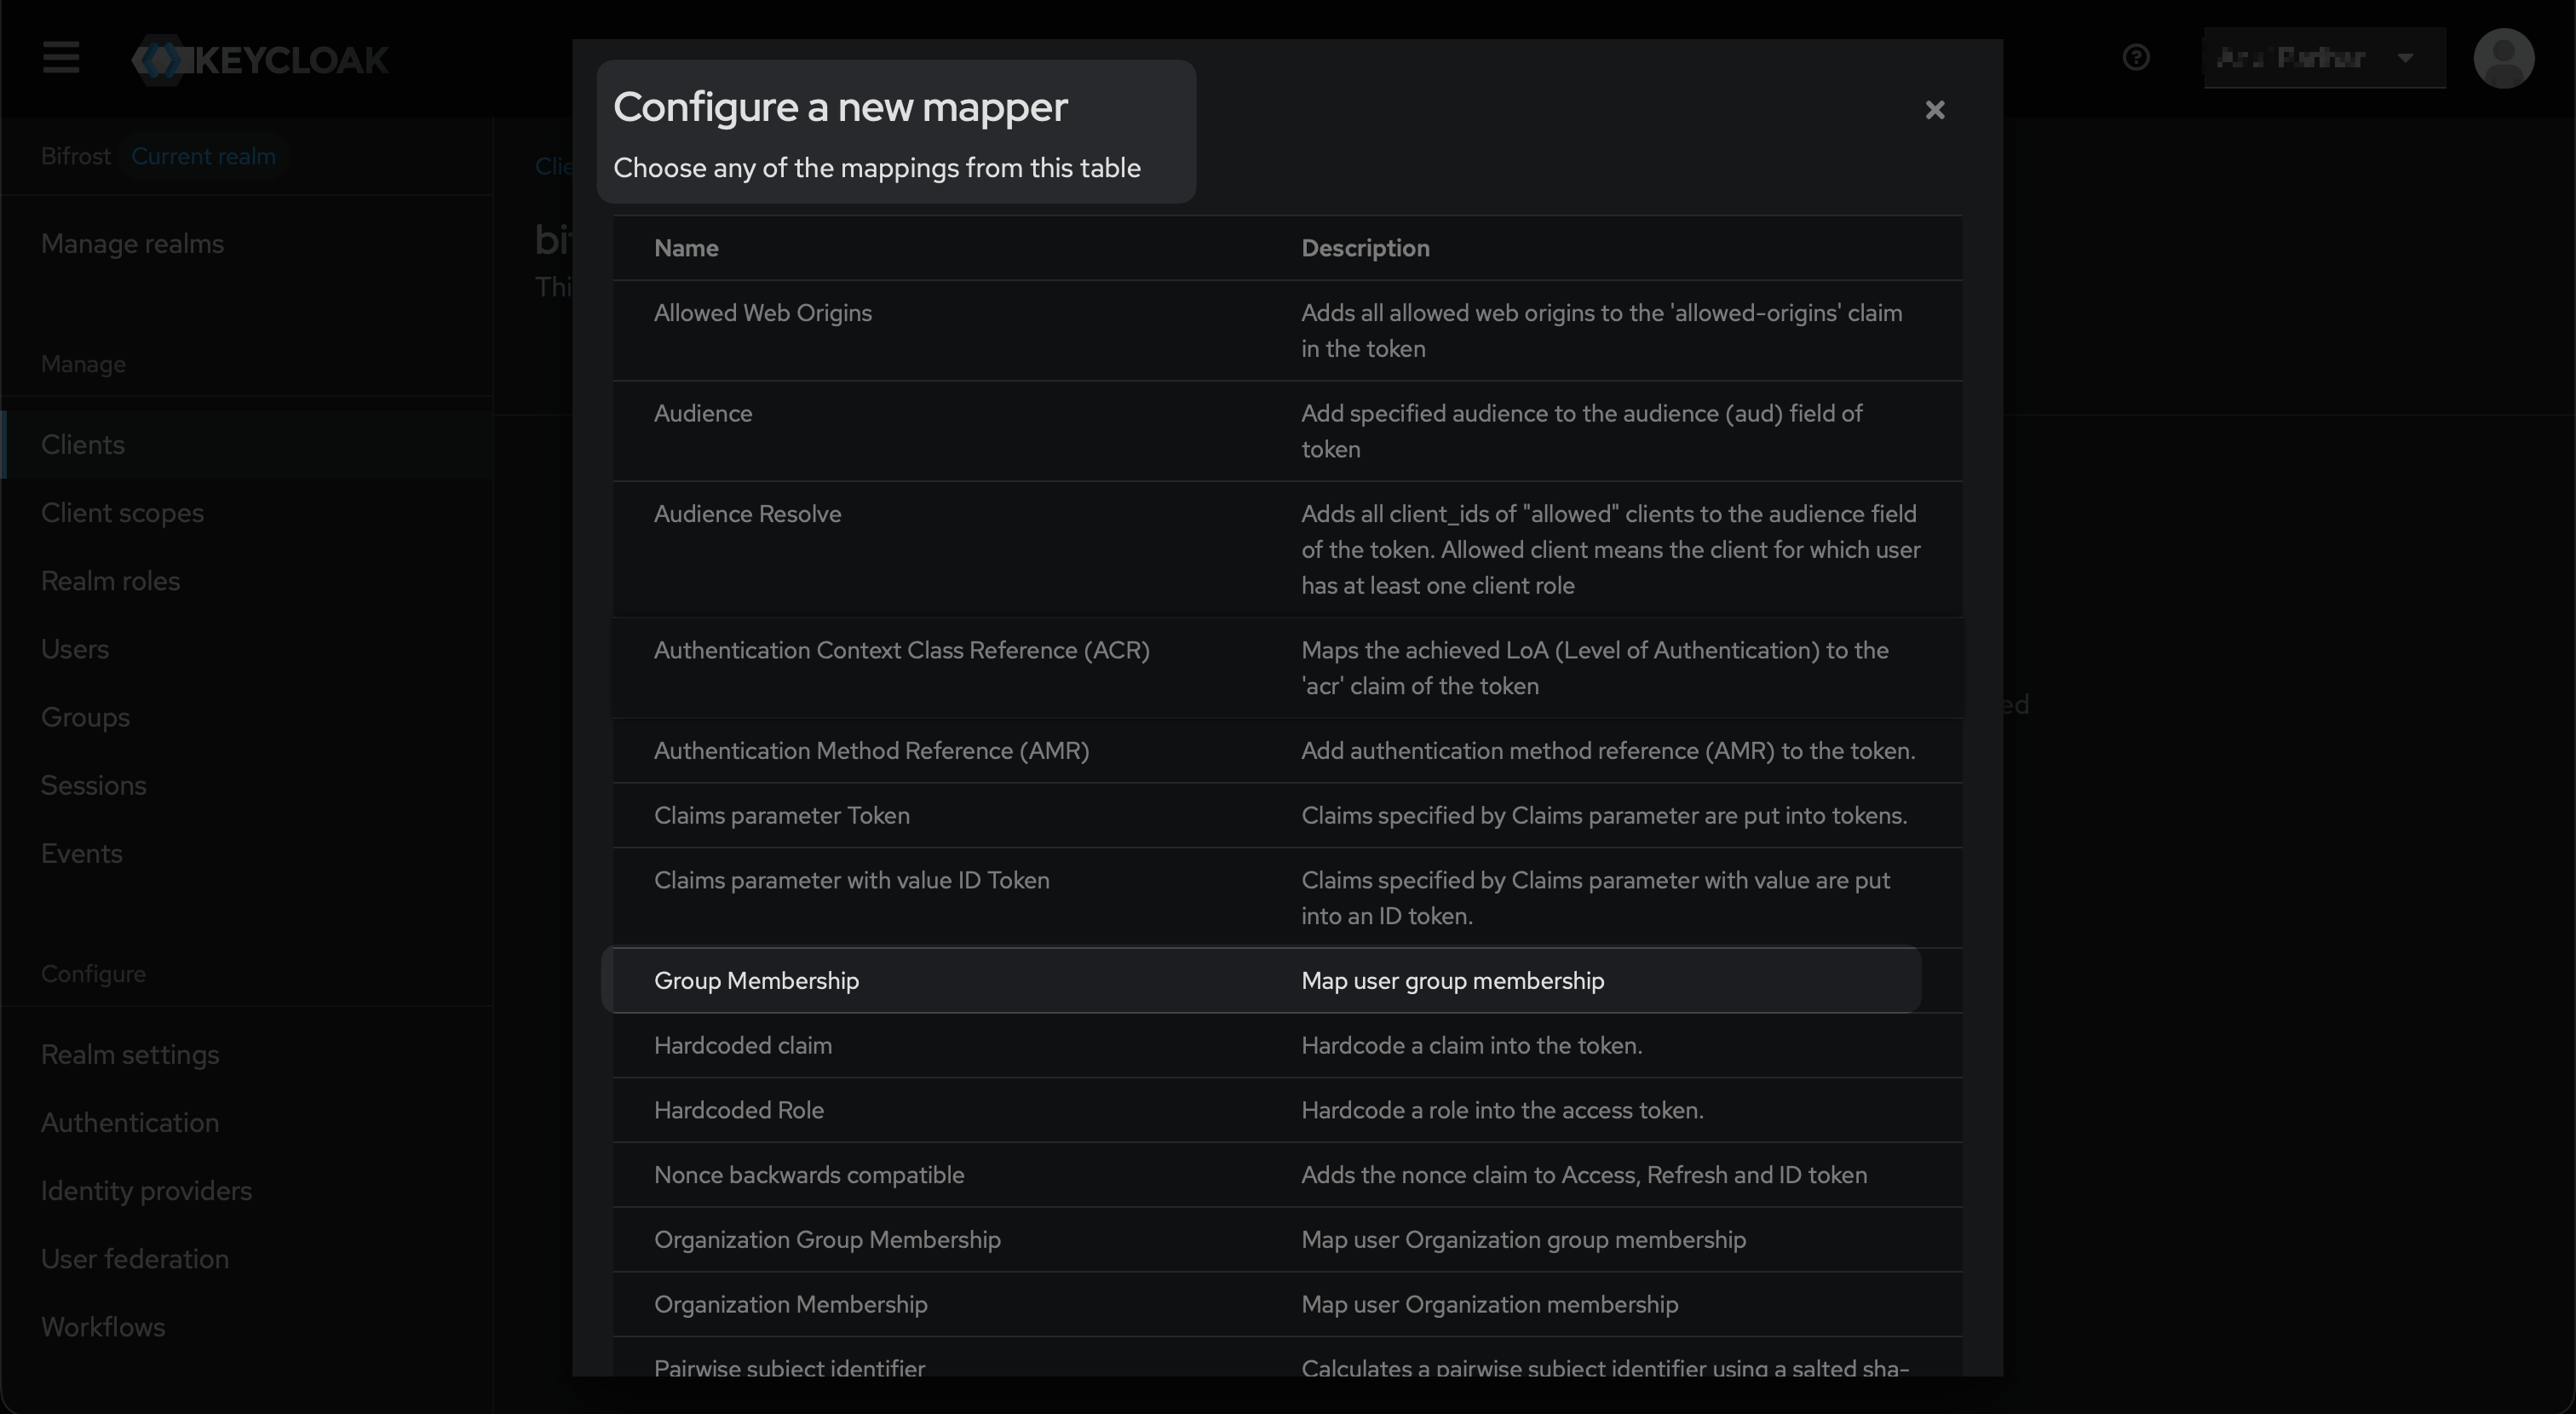
Configure a new mapper - select Group Membership from the list.
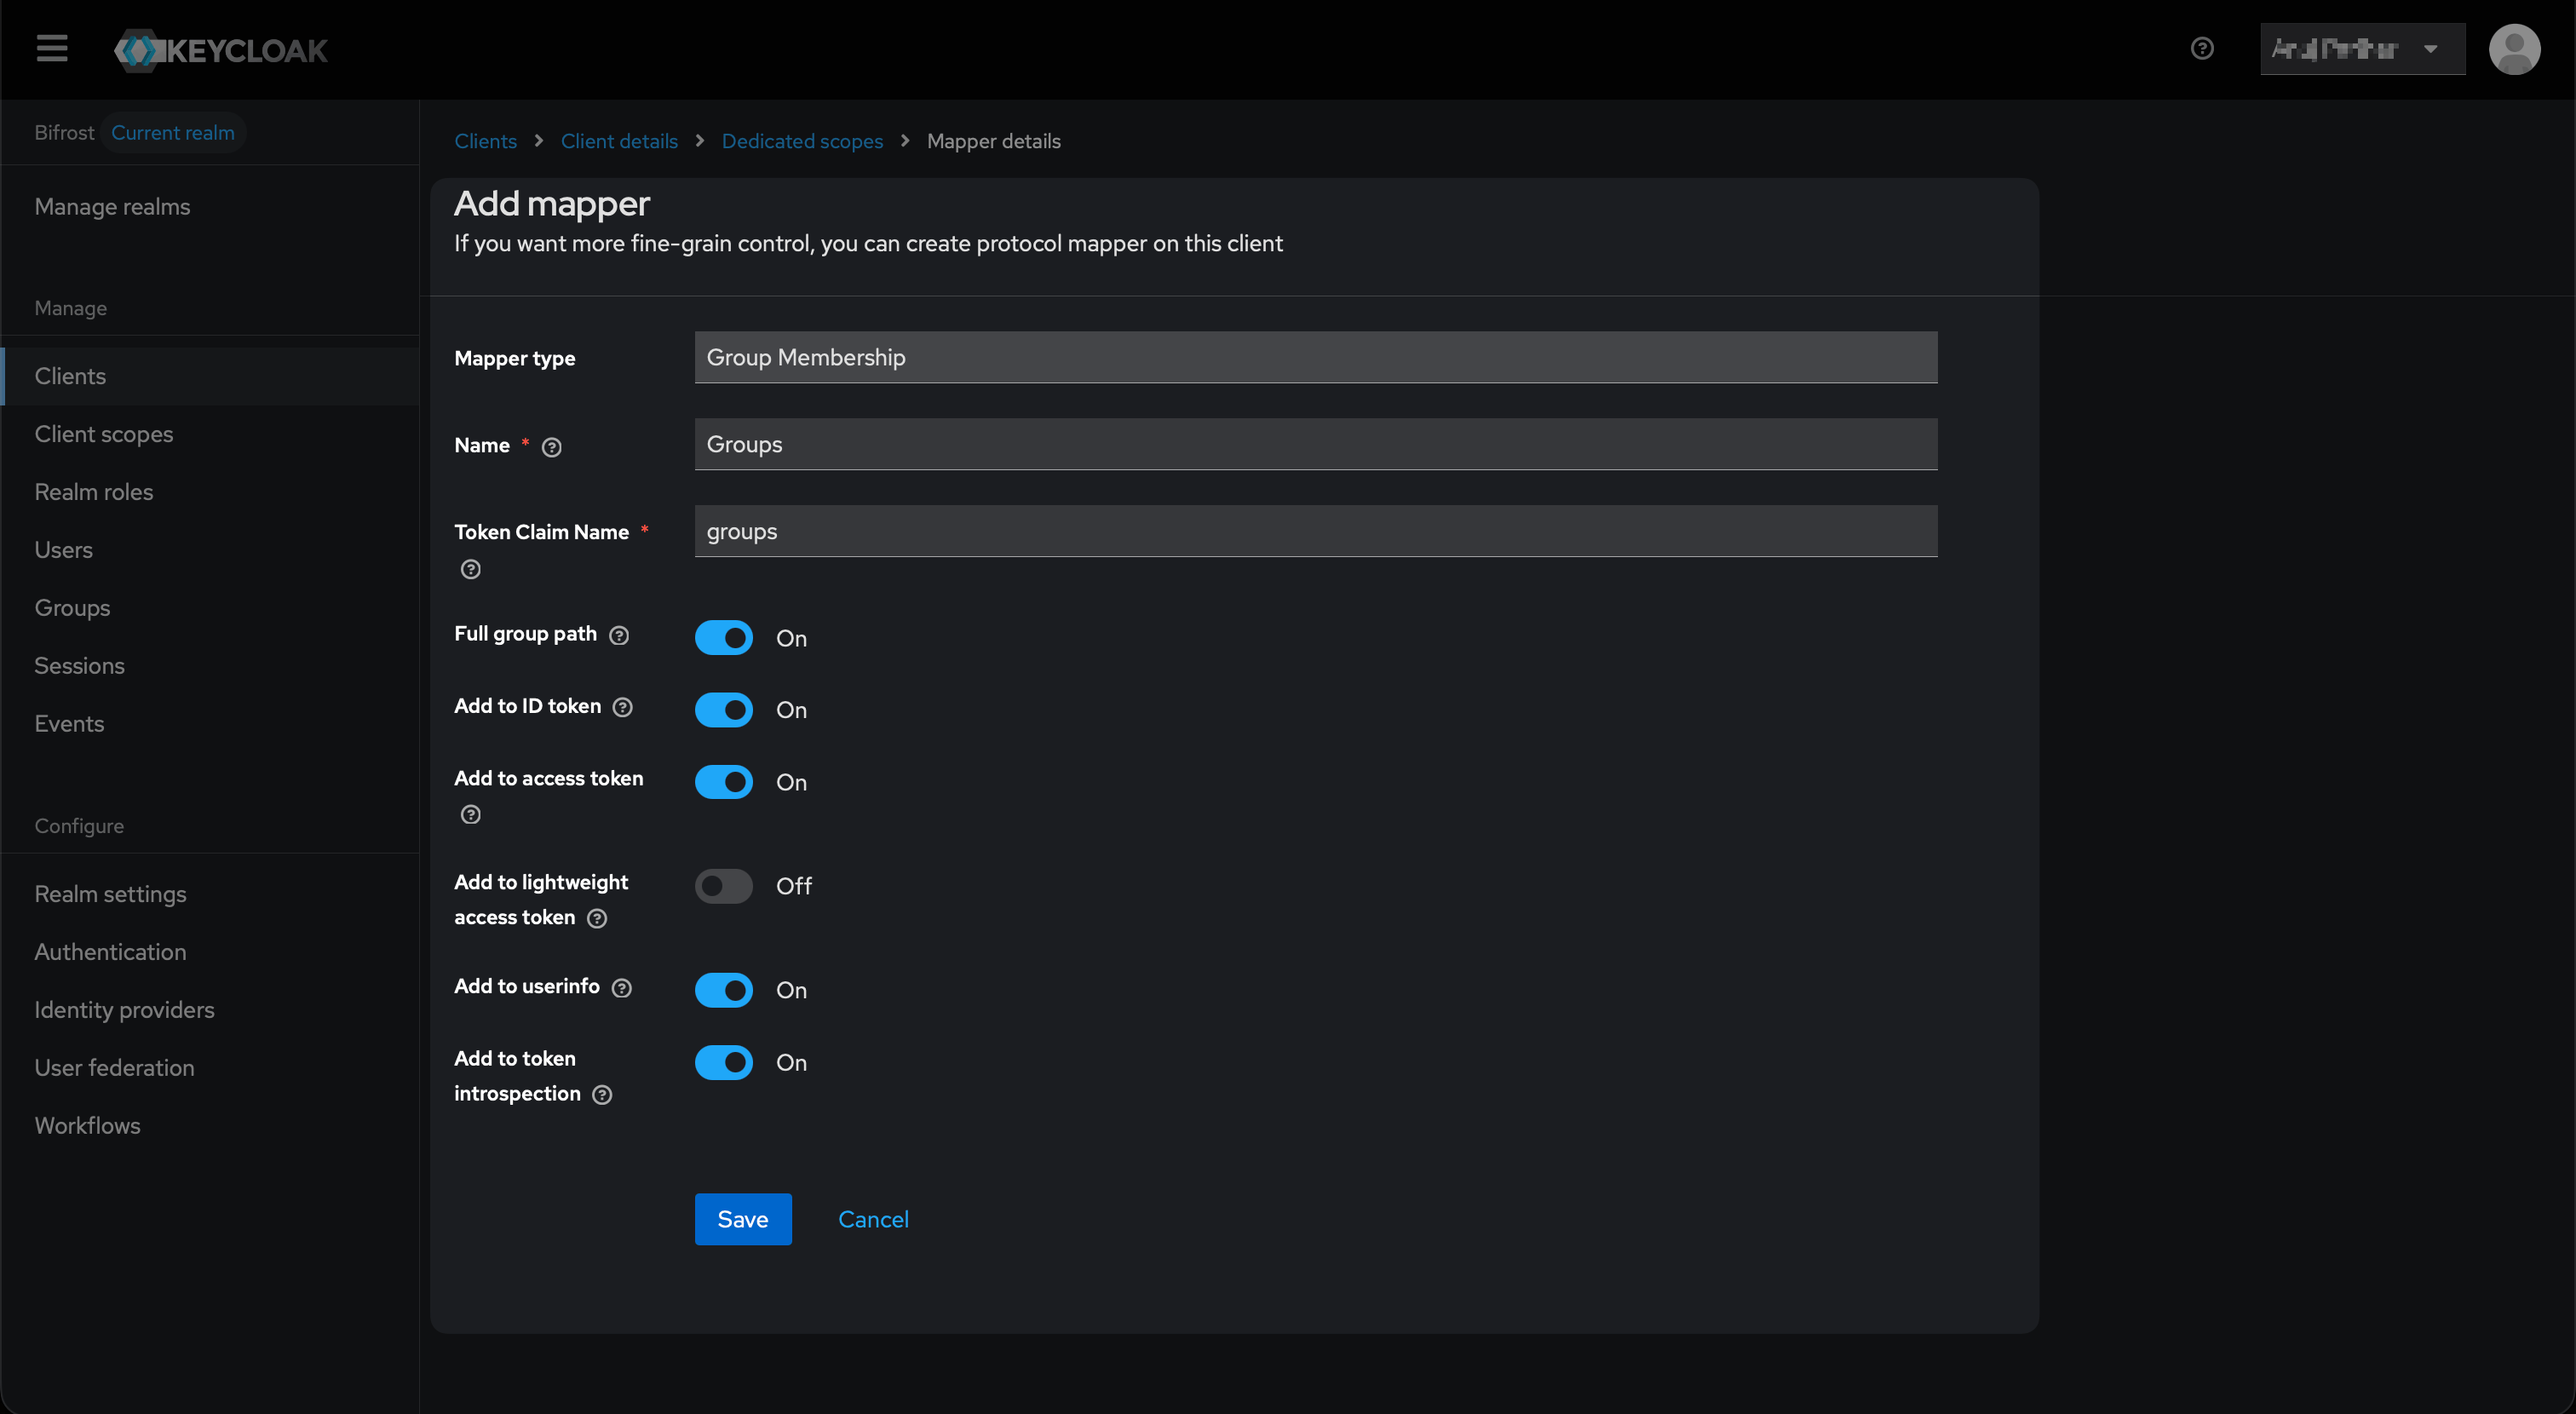
Group Membership mapper - Full group path must be On so Bifrost receives paths like /Engineering instead of just Engineering.
/Engineering, /Platform). Bifrost’s /${*} wildcard in team mappings extracts the name after the slash automatically - see Step 5.Add the User Realm Role mapper
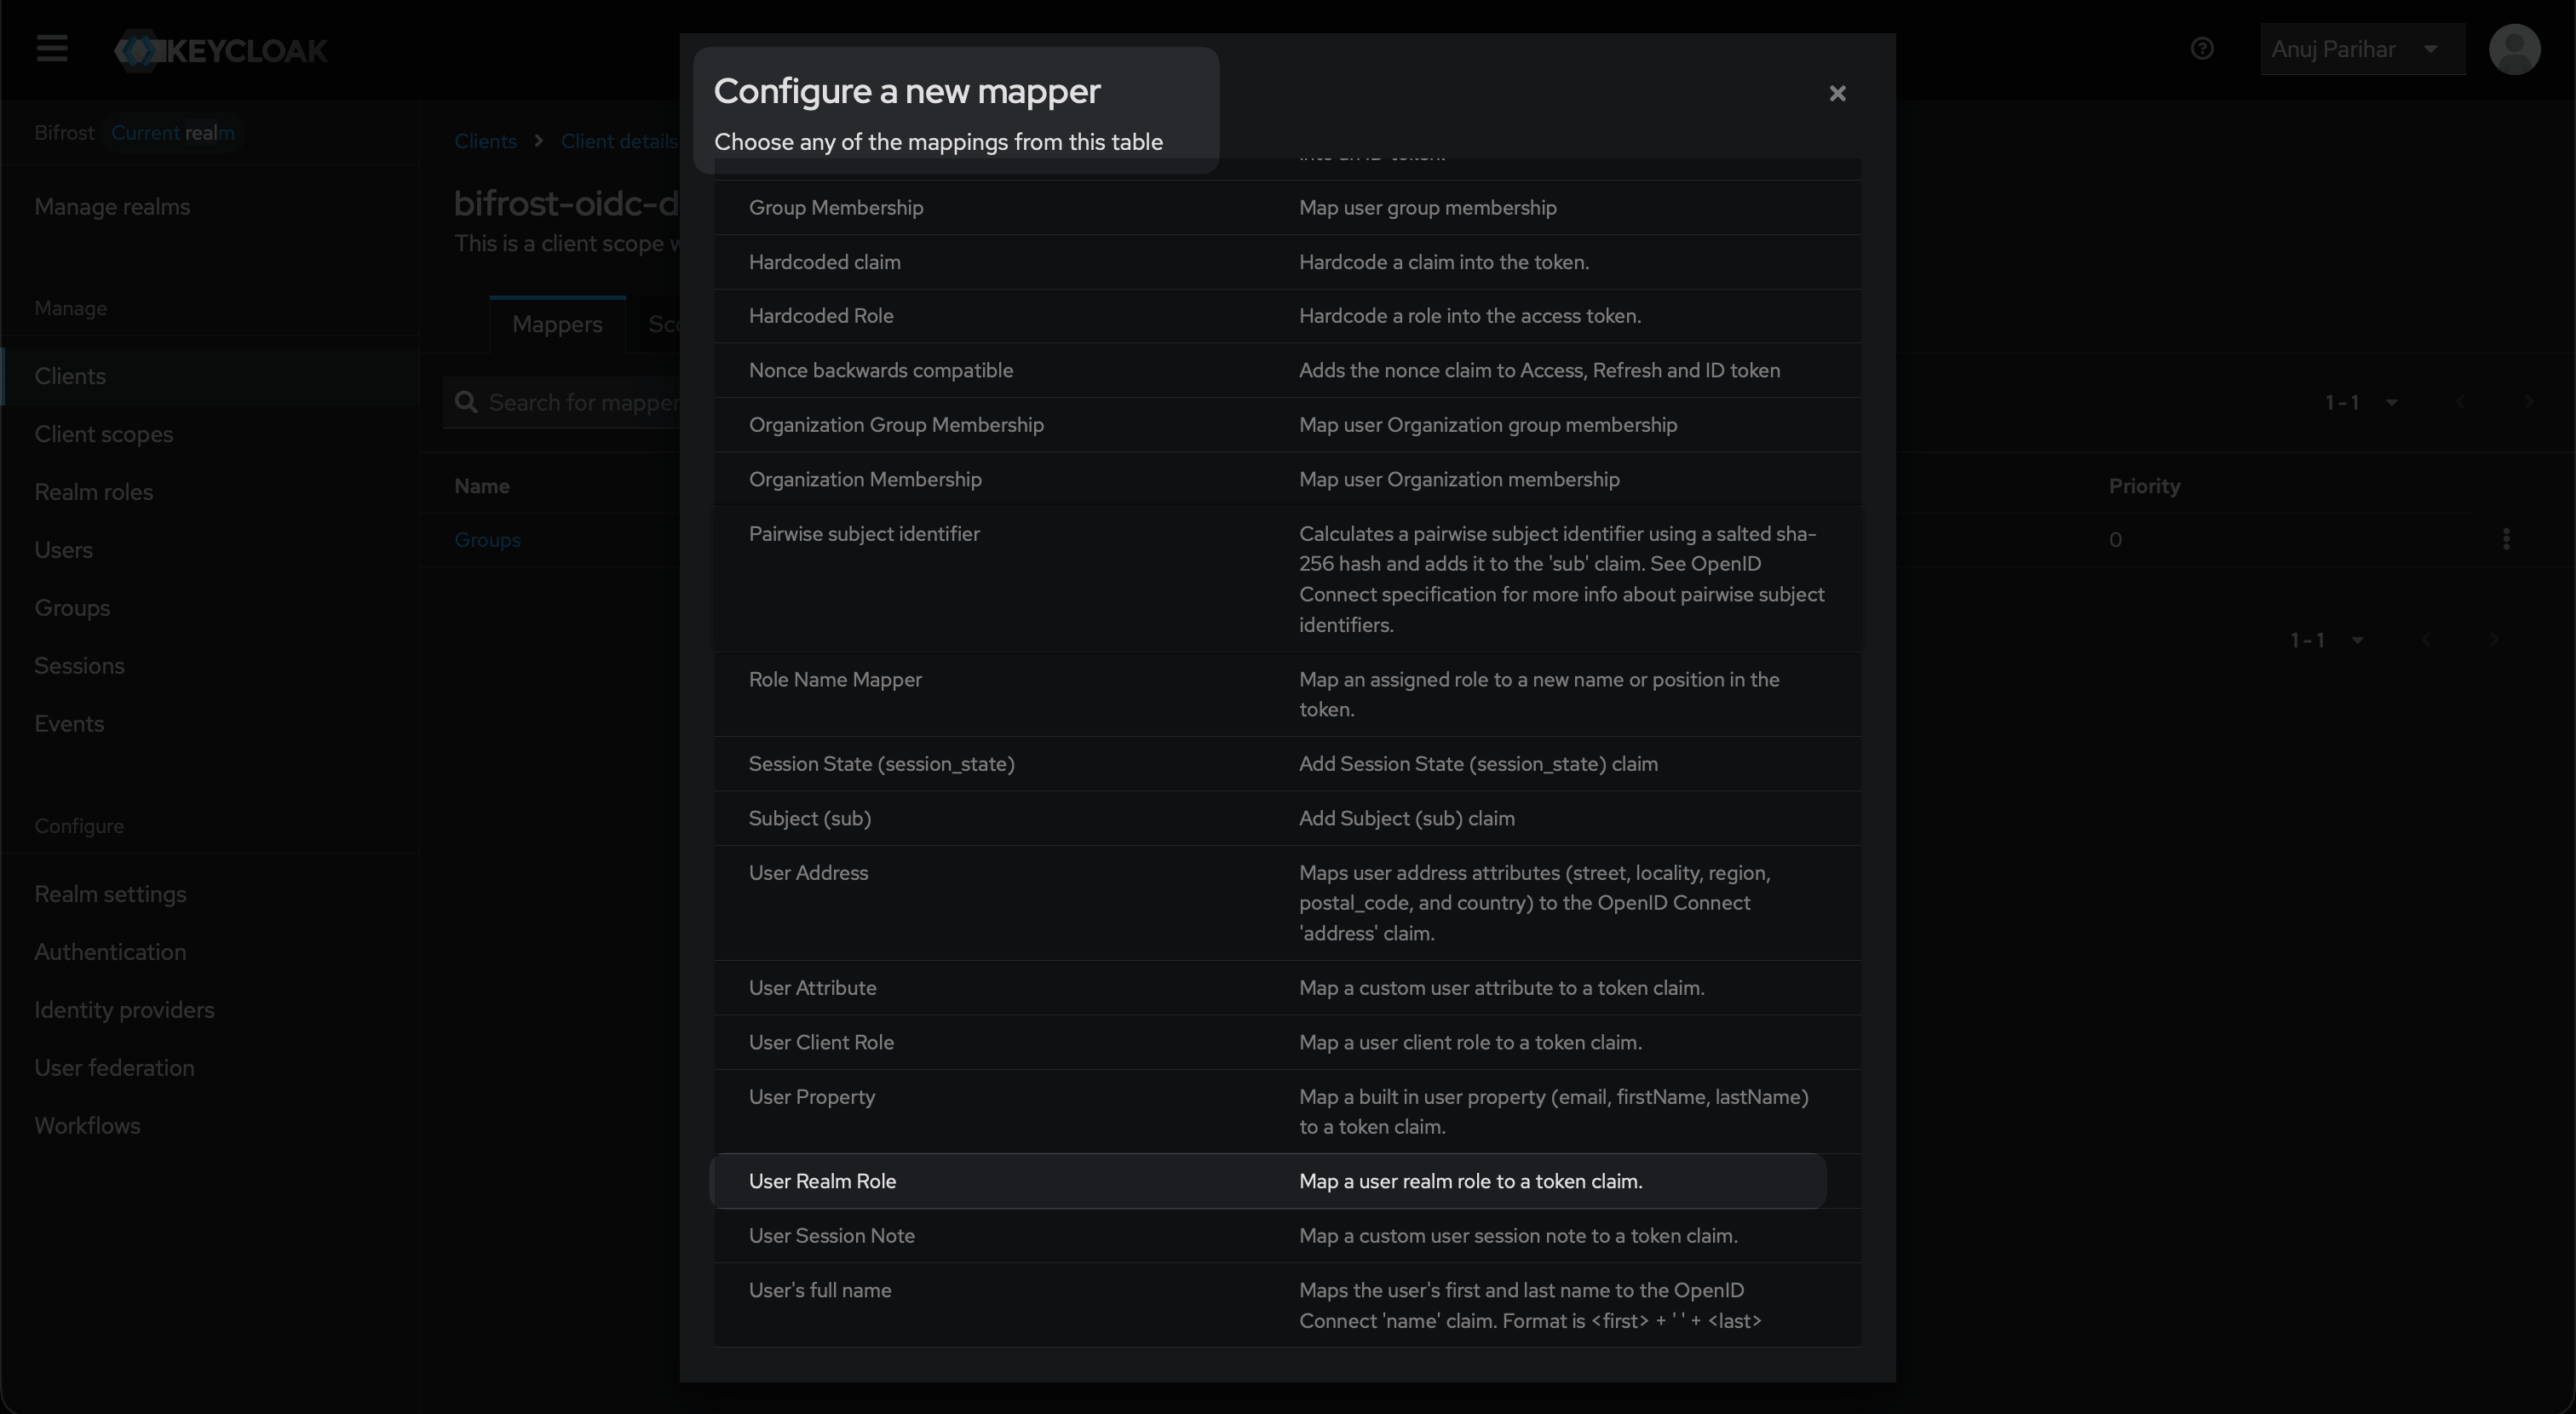
Select User Realm Role from the mapper list to expose realm roles in the JWT.
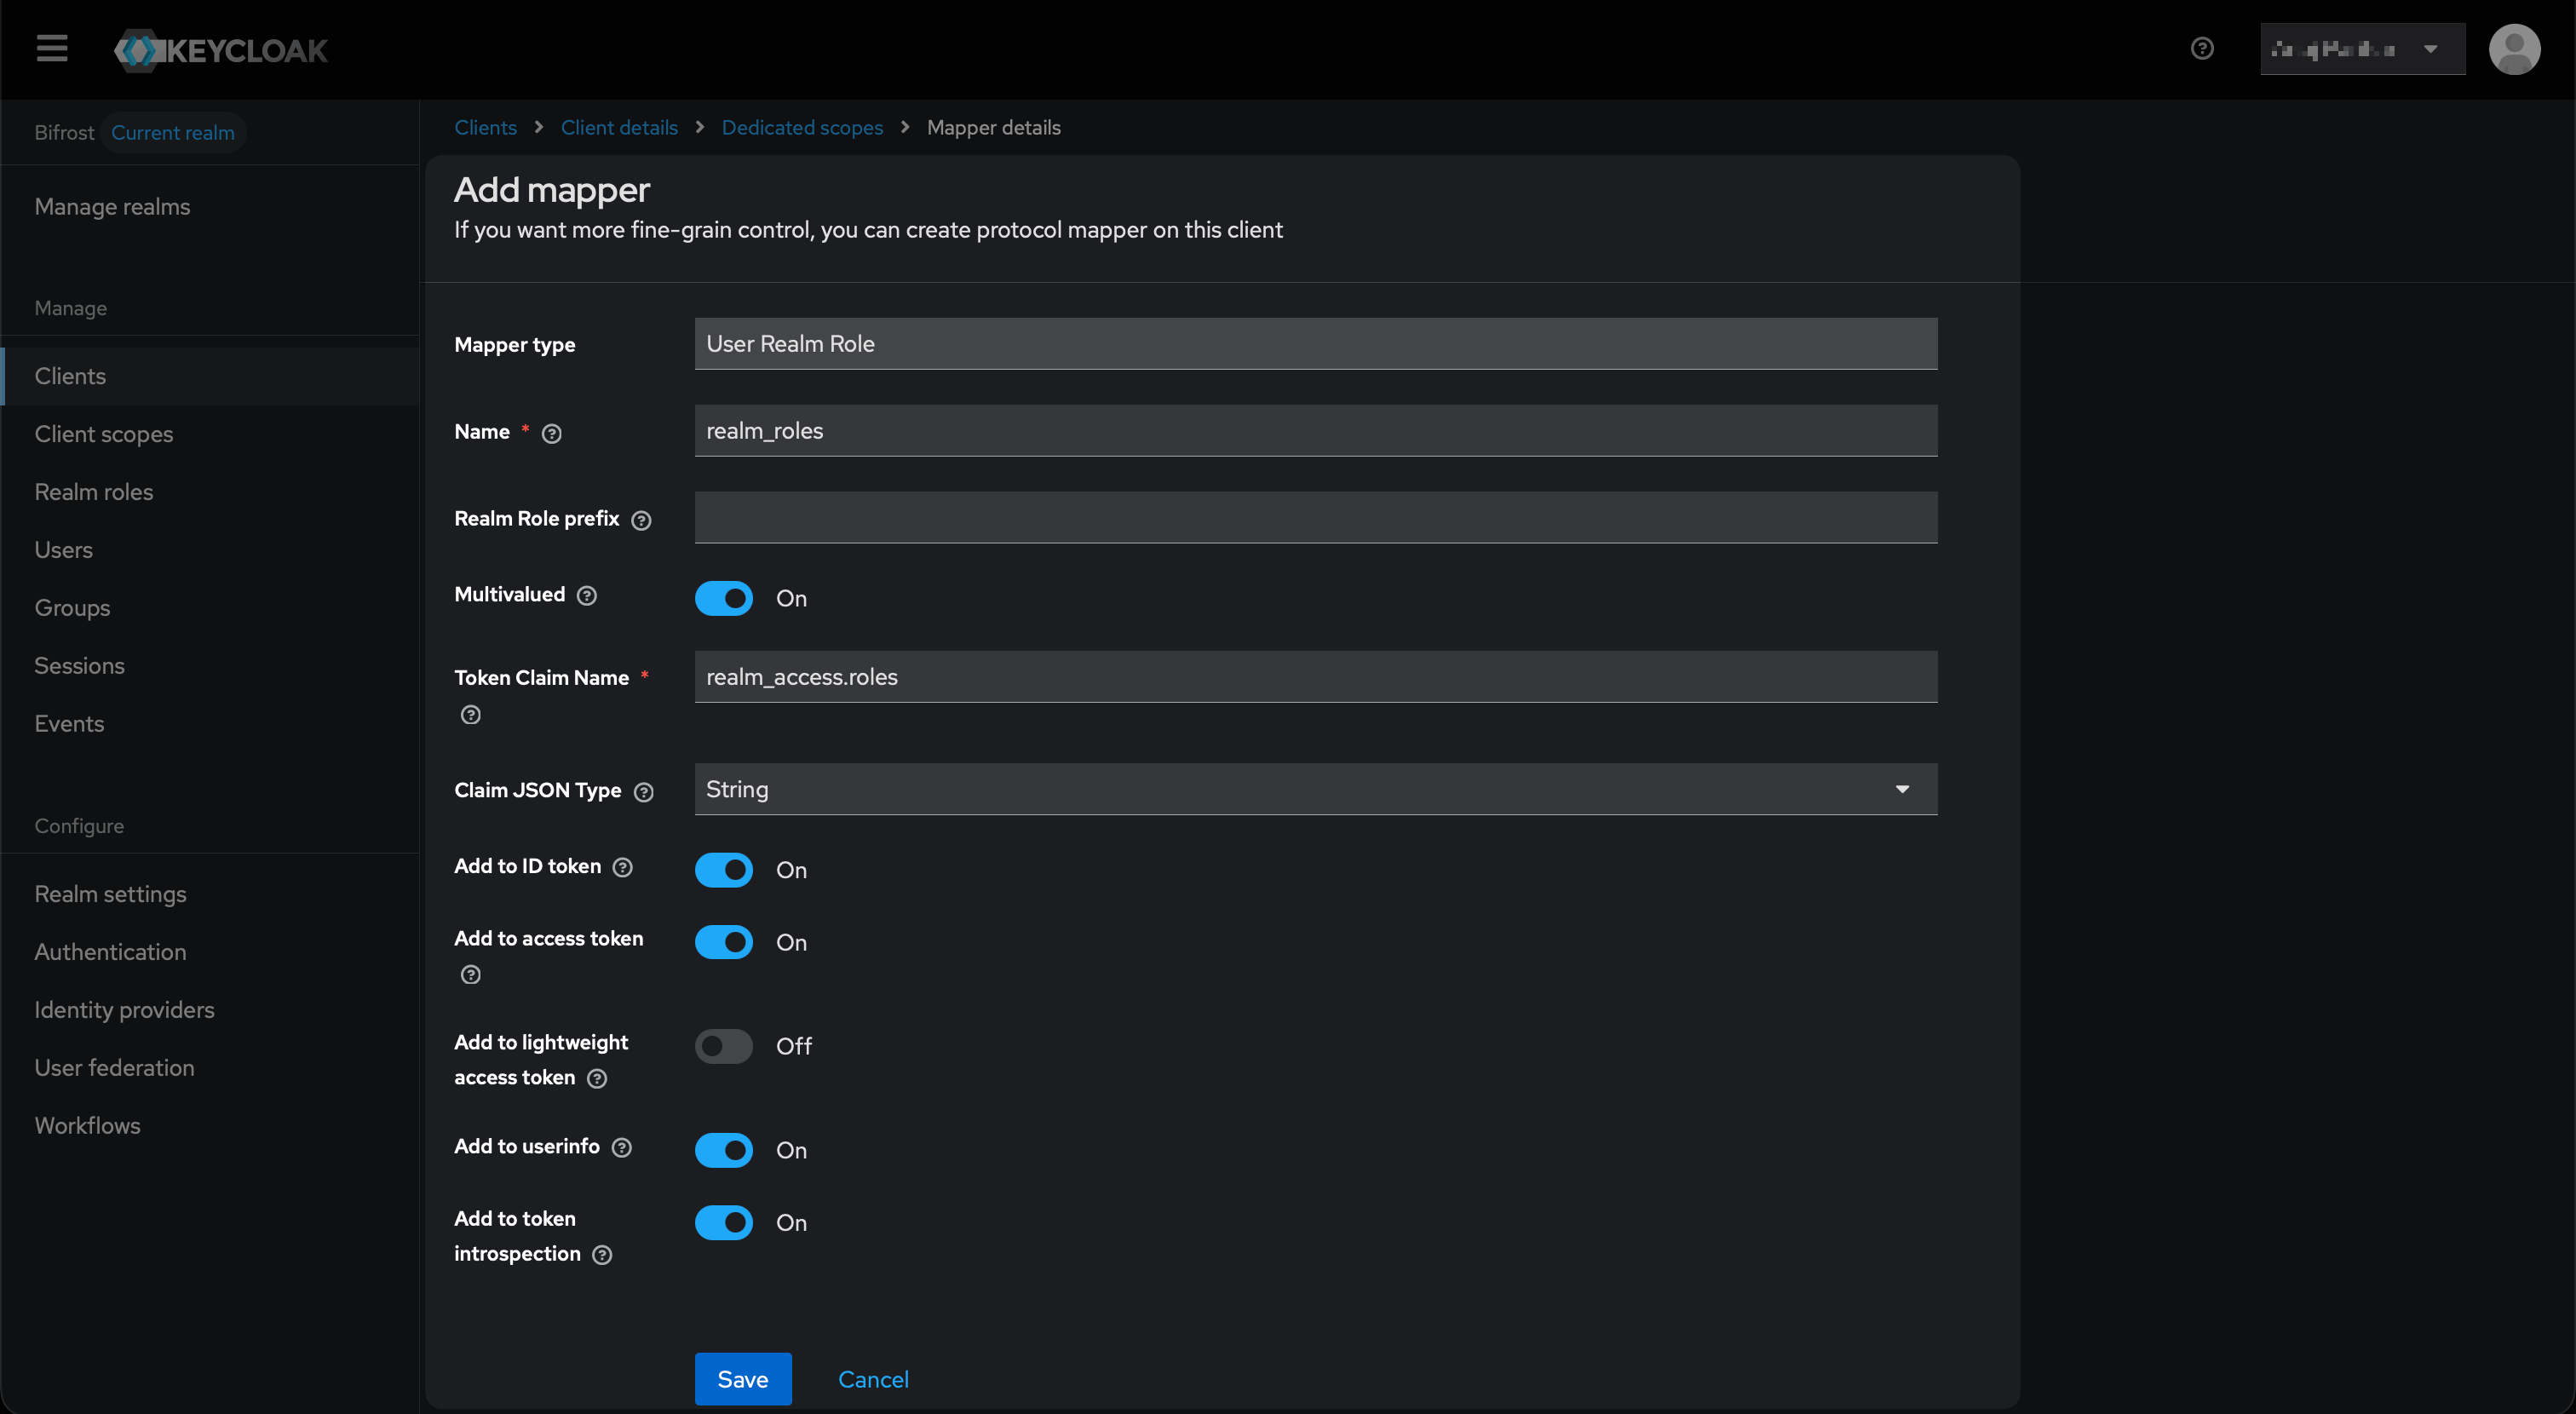
User Realm Role mapper - Token Claim Name realm_access.roles matches the dotted path Bifrost uses for role lookup.
Step 4: Assign Users
In Keycloak, users need to be assigned to the realm roles and groups you plan to map in Bifrost.- Go to Users → select a user → Role mapping tab → assign the relevant realm roles (e.g.
realm-admin,bifrost-viewer) - Go to Users → select a user → Groups tab → join the relevant groups (e.g.
/Engineering,/Platform)
Step 5: Configure Bifrost
Open User Provisioning and choose Keycloak
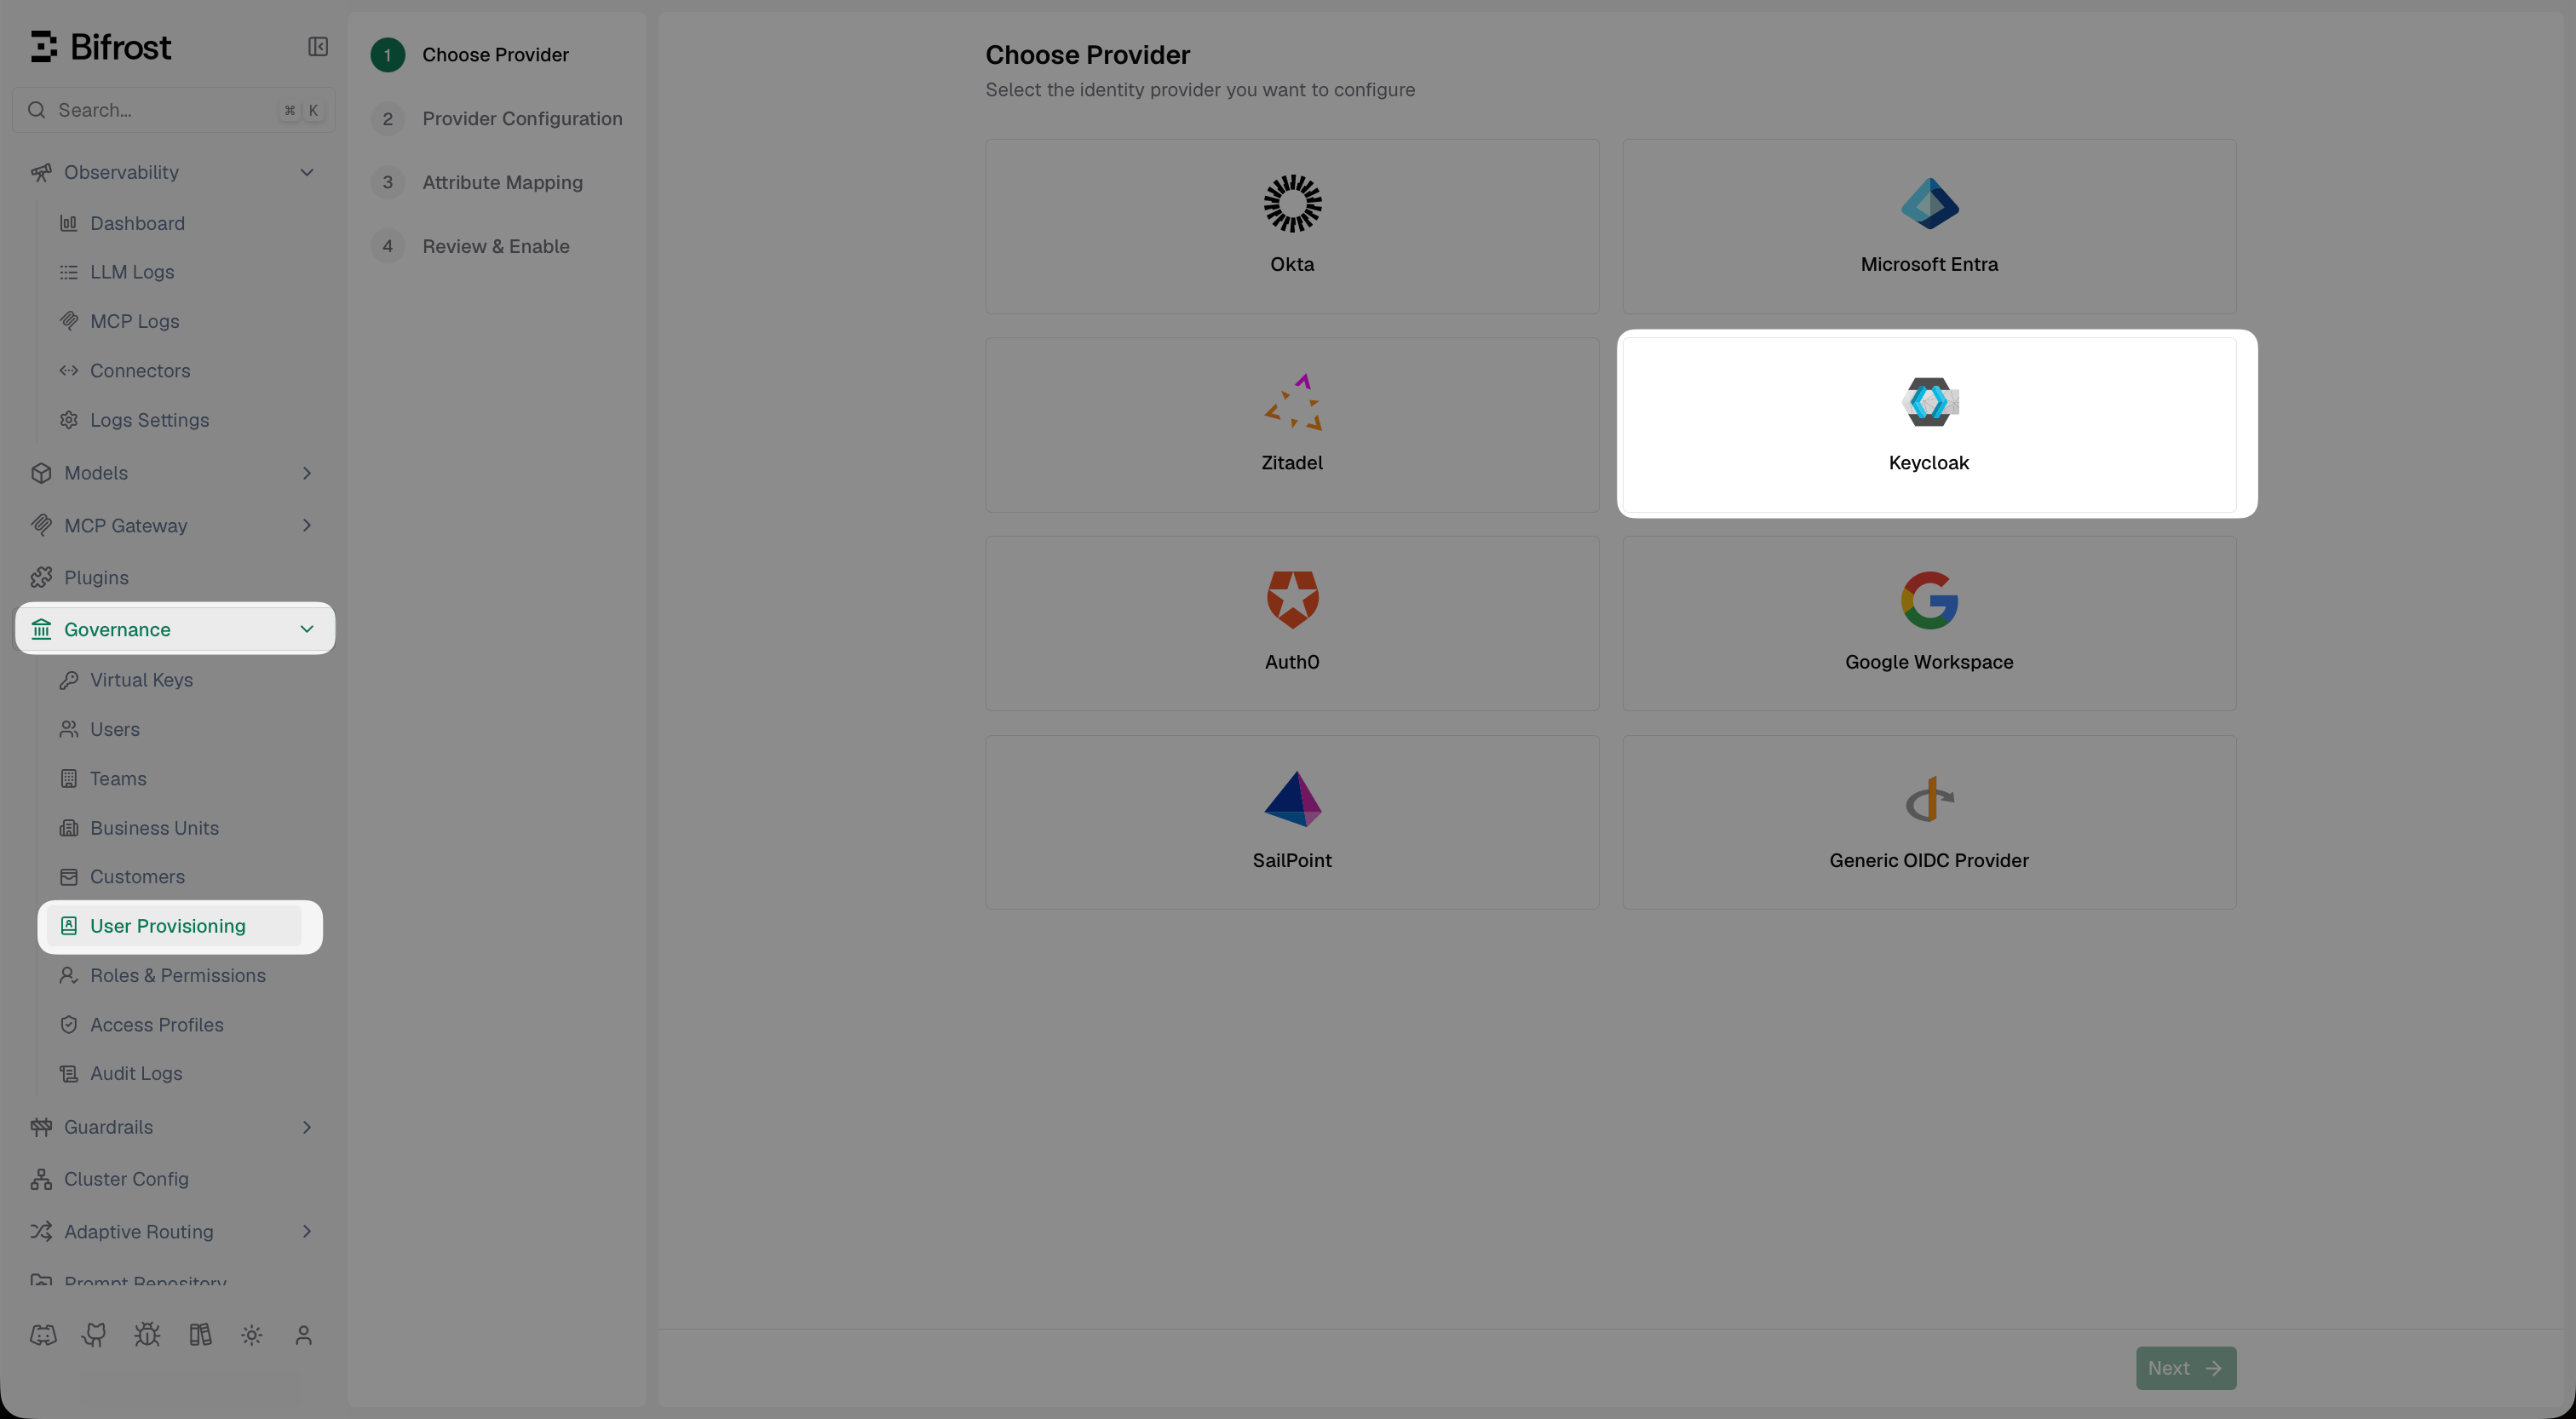
Select Keycloak from the list of identity providers.
Fill in the provider configuration
- Server URL: your Keycloak base URL - no
/realms/...suffix (e.g.https://keycloak.company.com) - Realm: your realm name (e.g.
Bifrost) - Client ID: the client ID you set in Step 1 (e.g.
bifrost-oidc) - Client Secret: copied from Step 2
- Audience: optional - leave blank to default to the Client ID
- Team IDs Field (Optional): leave as
groupsto match the mapper you created in Step 3
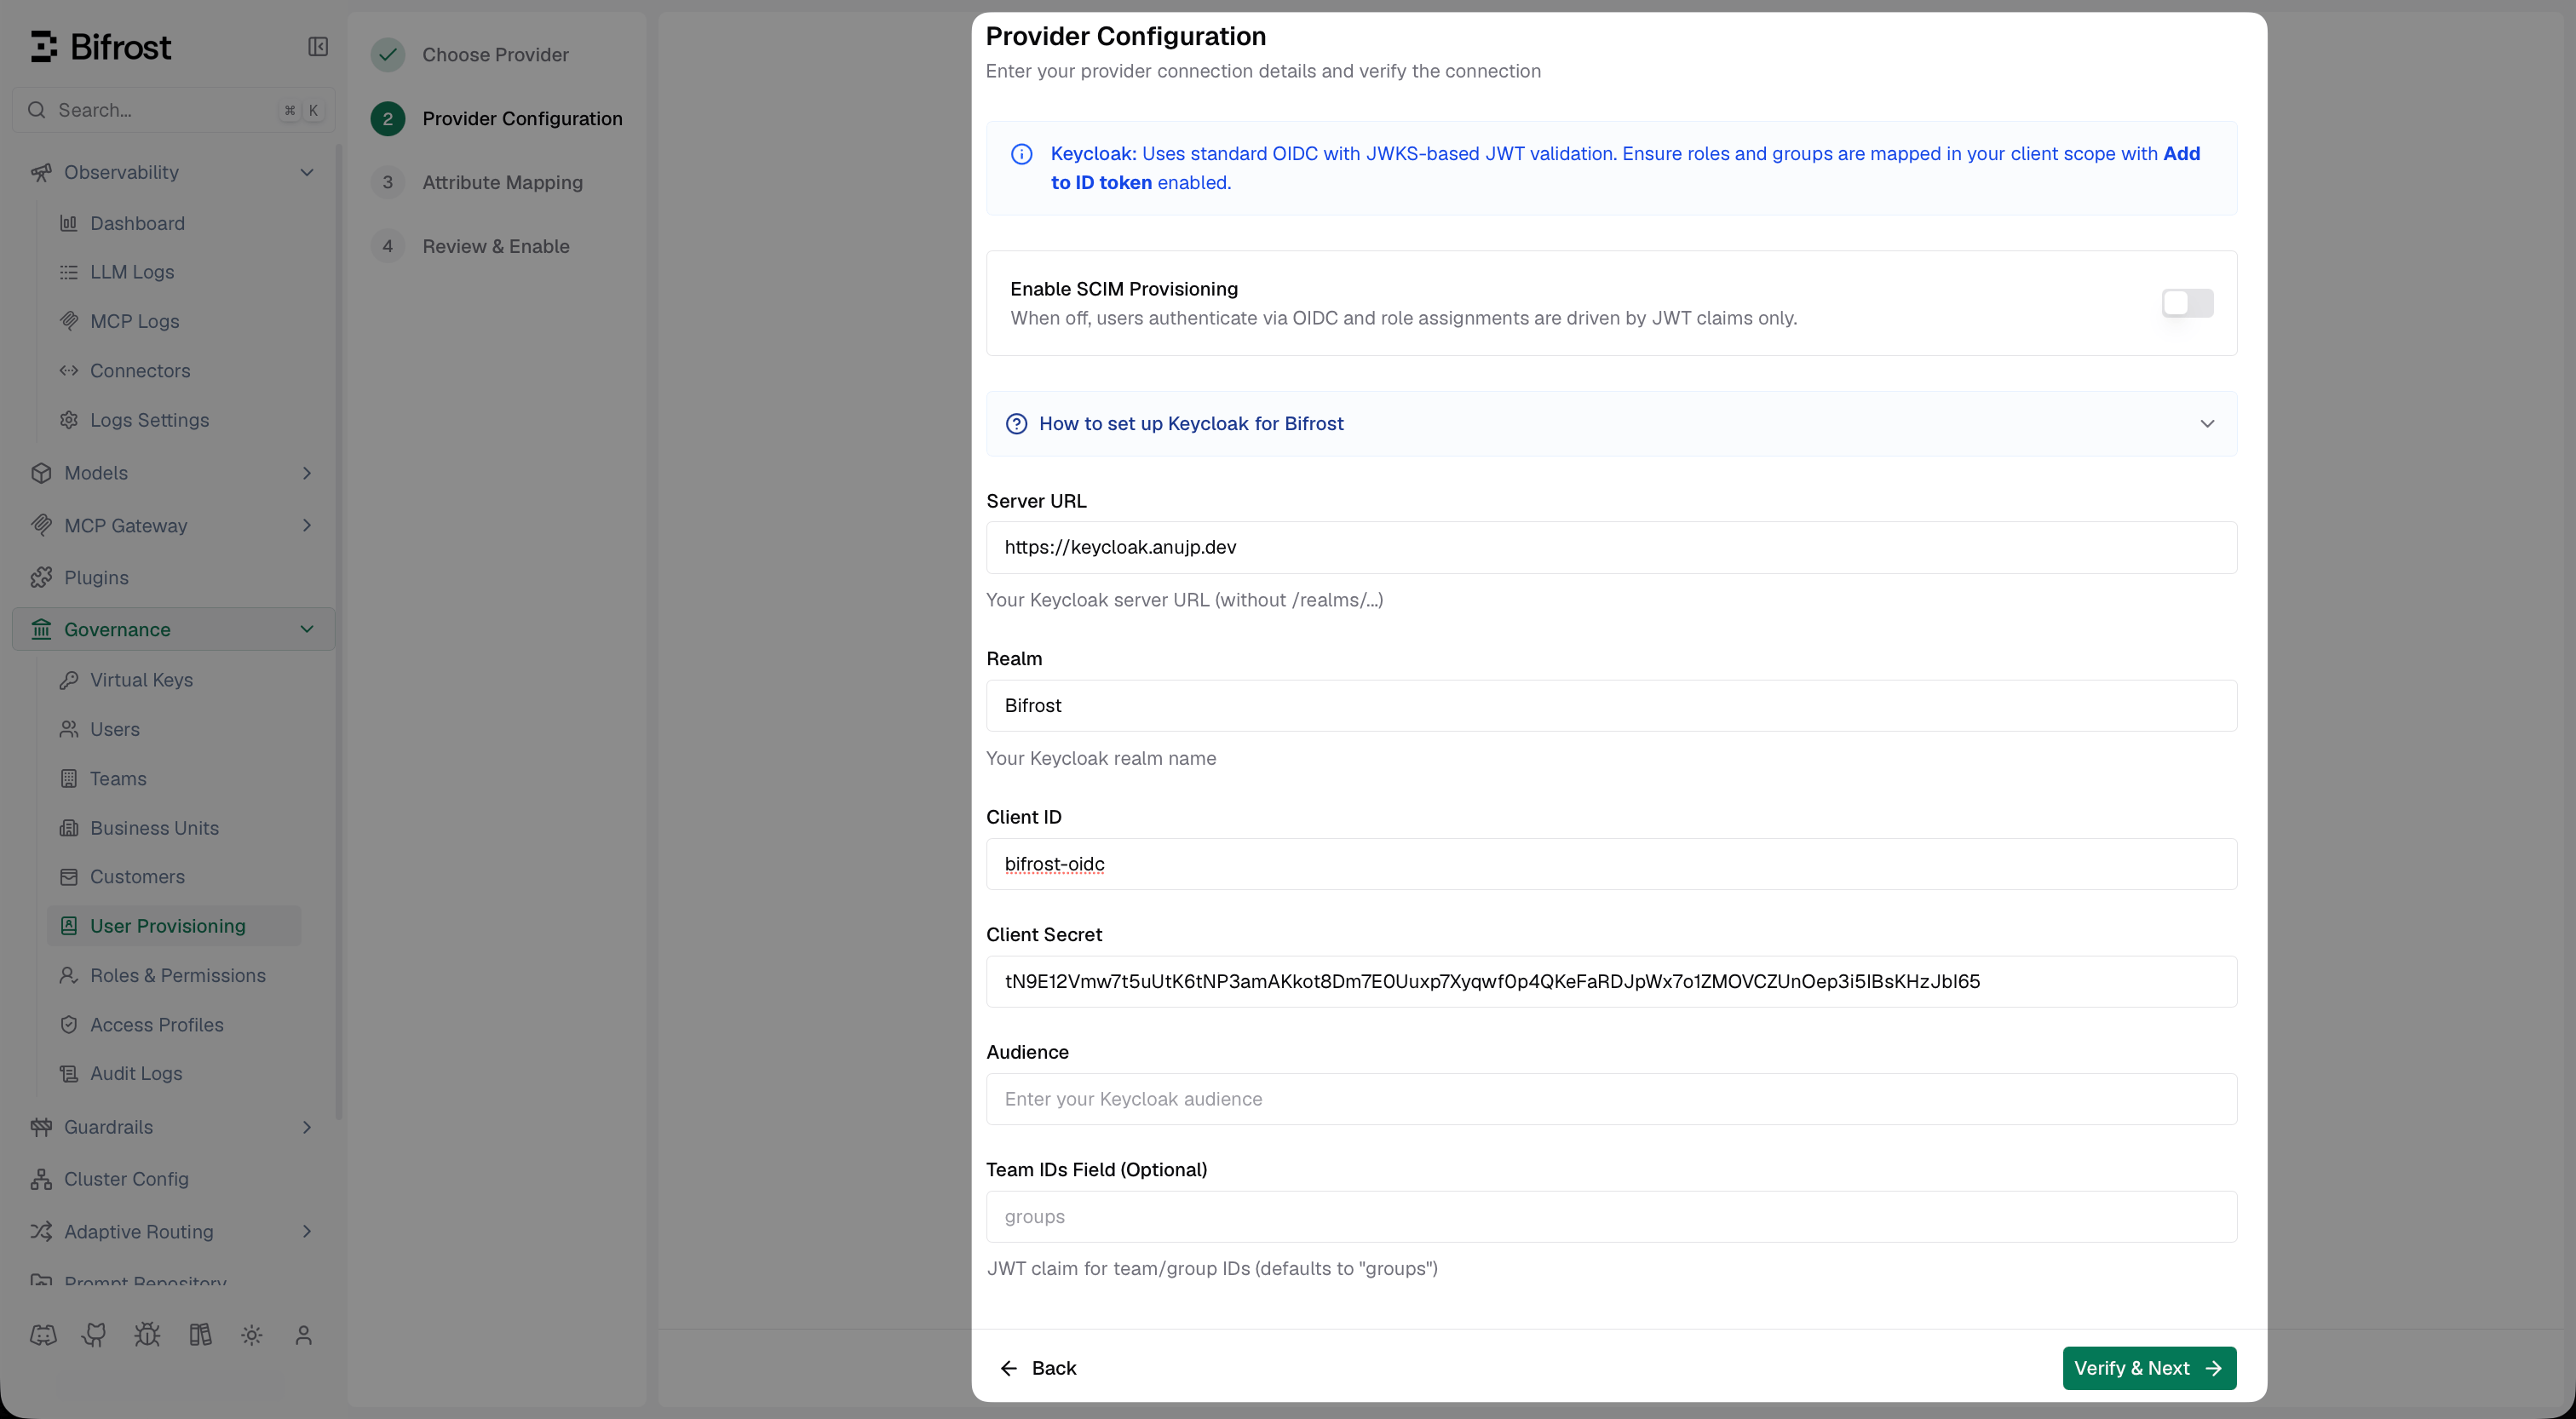
Provider Configuration - enter your Keycloak Server URL, Realm, Client ID, and Client Secret.
Discover claims
groups and realm_access.roles appear before building your mappings.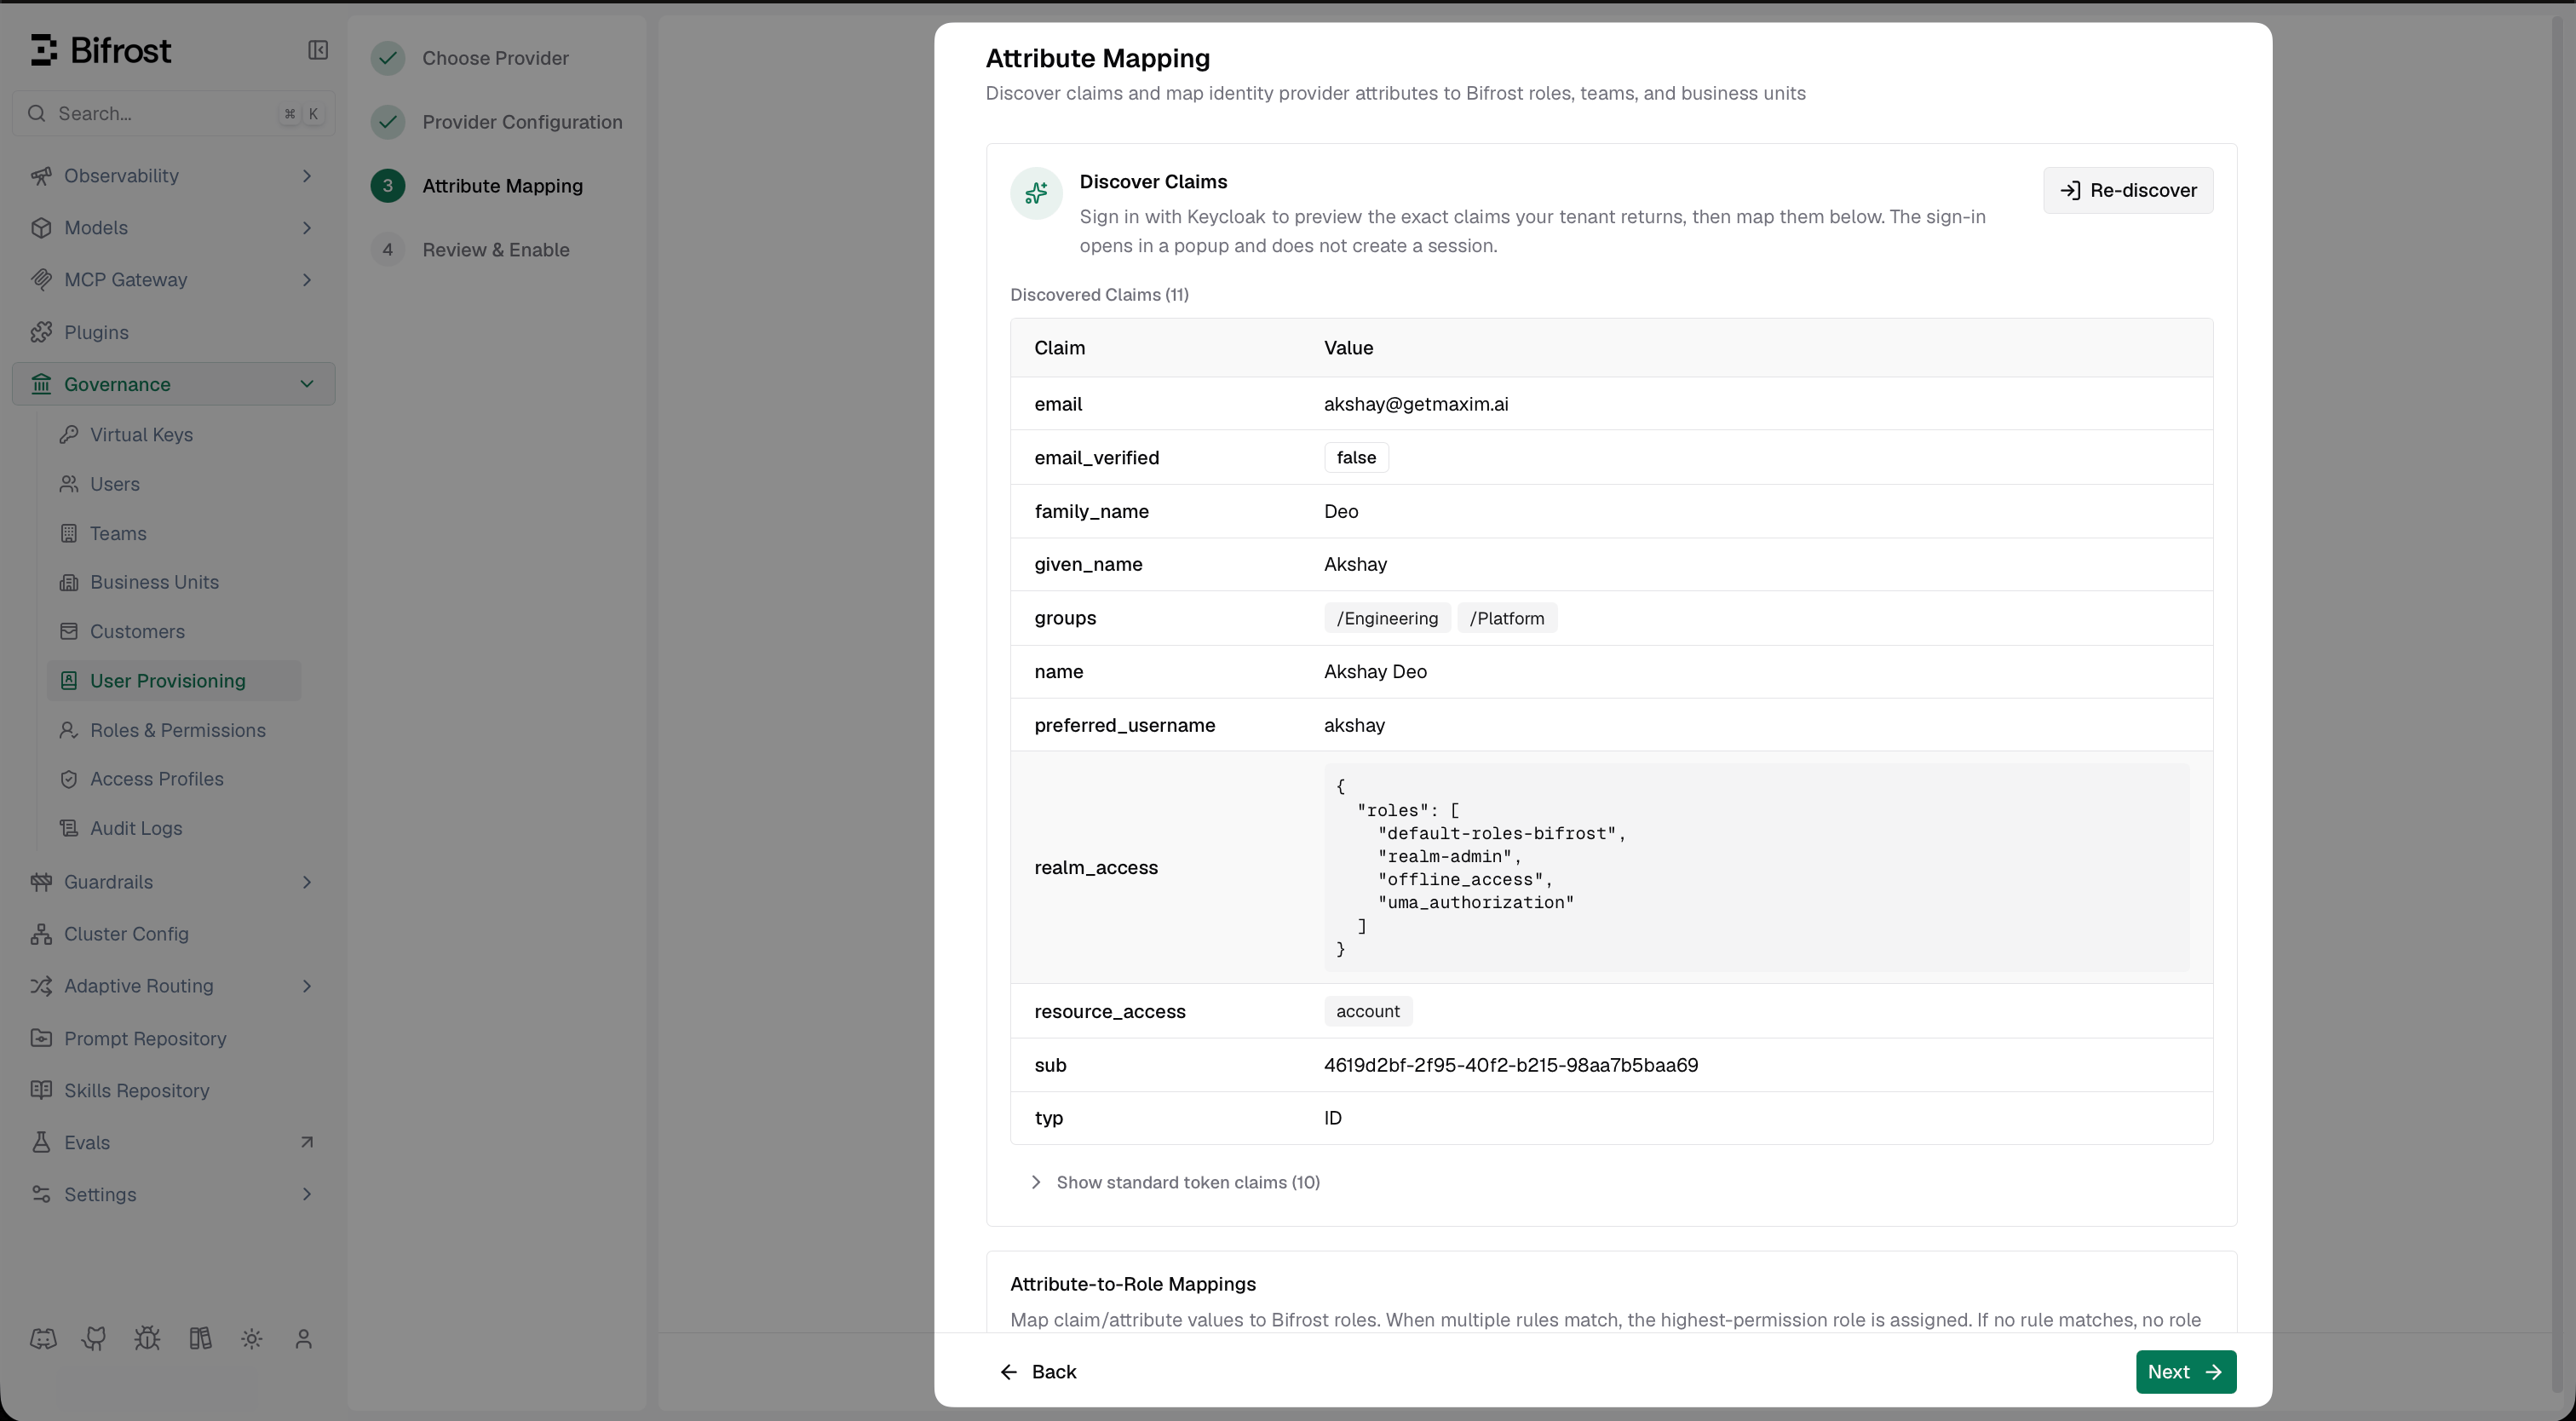
Discover Claims shows the live JWT from Keycloak - confirm groups (full paths) and realm_access.roles are present.
Set up attribute mappings
- The role with the most permissions (default)
- The first matching role, by list order (drag rows to set priority)
realm_access.roles → realm-admin → Admin, and realm_access.roles → bifrost-viewer → Viewer.Attribute-to-Team MappingsMap a claim value to a Bifrost team. All matching rules apply. Three value formats work:- Exact value - e.g.
/Engineeringmaps that specific group to a fixed team name *- syncs the claim value directly as the team name/${*}- extracts the group name from Keycloak’s full group path - e.g./${*}matches/Engineeringand creates team Engineering, and matches/Platformand creates team Platform
- Exact value - maps a specific claim value to a fixed business unit name
*- syncs the claim value directly as the business unit name/${*}- extracts the group name from Keycloak’s full group path, same as team mappings (e.g./${*}on/Engineering→ business unit Engineering)- When a rule matches, the resolved business unit is assigned to the user. All matching rules apply, so a user can belong to several business units at once
- A business unit you assign by hand stays until you remove it, unless a mapping later grants the same one, in which case it follows your IdP. One granted from a claim is removed at a later sign-in where the attribute is present and no longer matches; a refreshed token that leaves the attribute out entirely doesn’t remove it
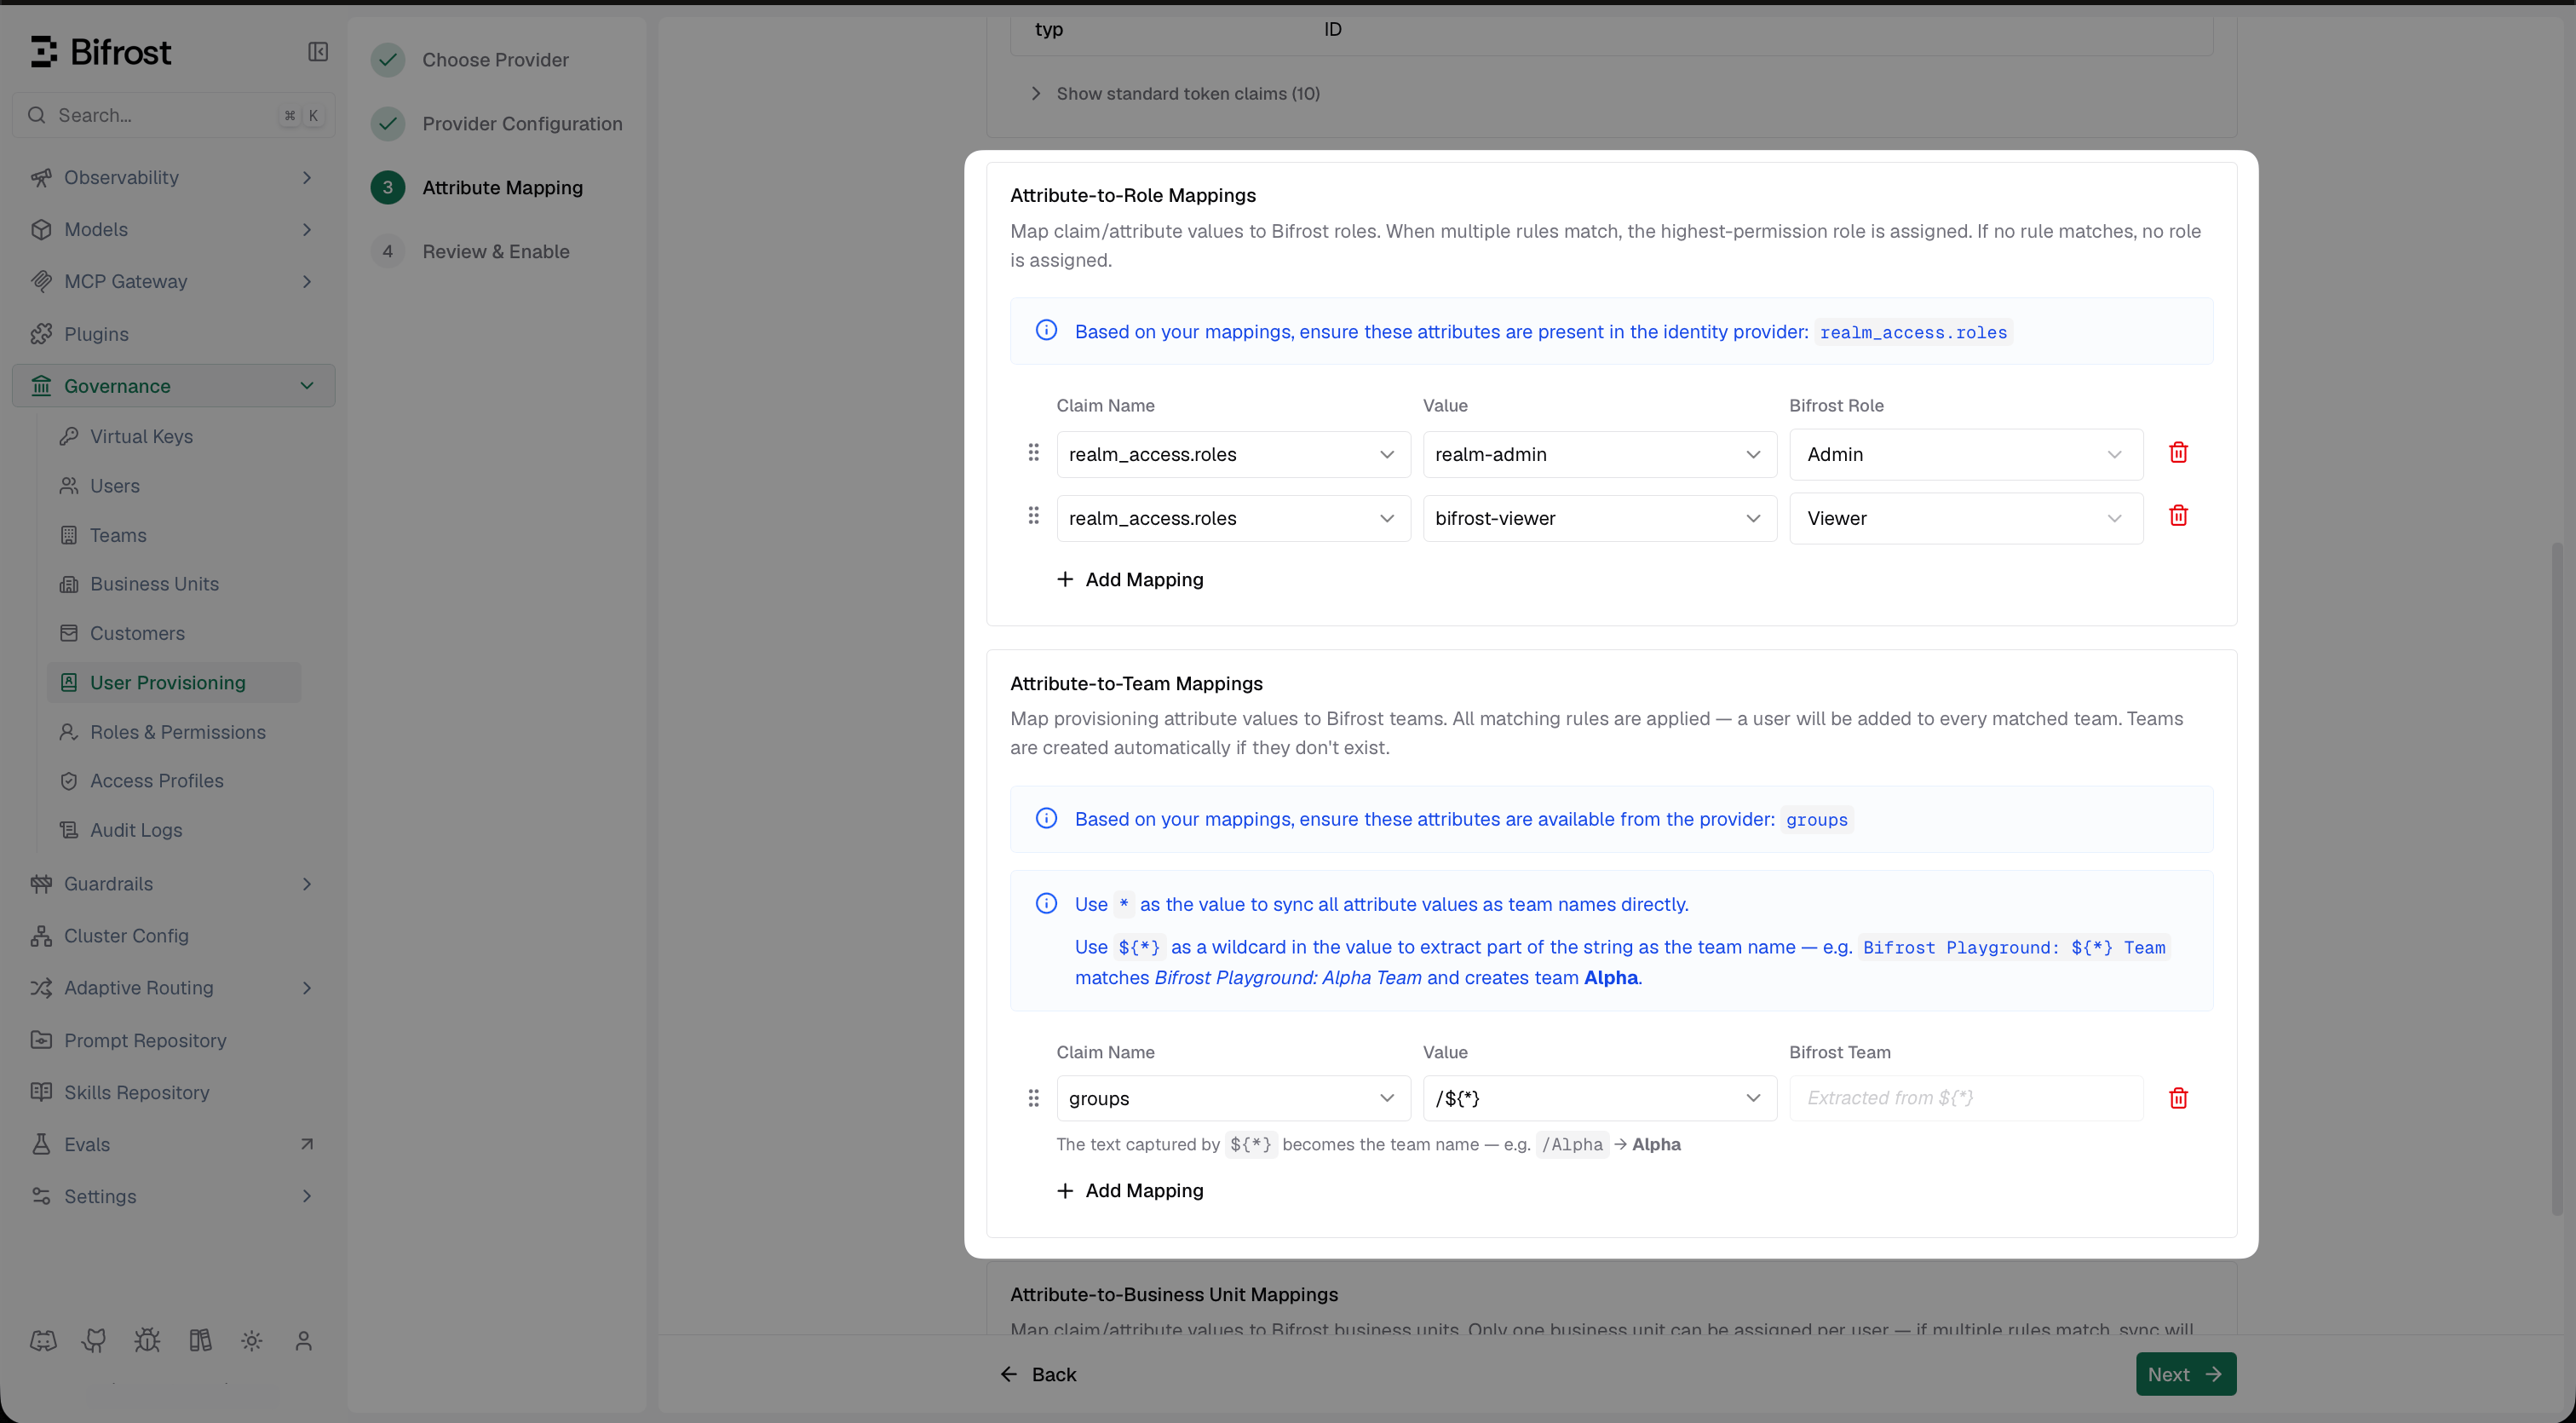
Attribute Mapping - role rules use realm_access.roles, team rules use groups with /${*} to extract the team name from Keycloak's full group path.
Review and enable
Optional Next Steps
Import users from Keycloak - once SSO is configured, you can bulk-import users from Keycloak into Bifrost without waiting for each user to log in. Go to Governance → Users → Sync Users from Keycloak and filter by group or realm role to preview and import matching users.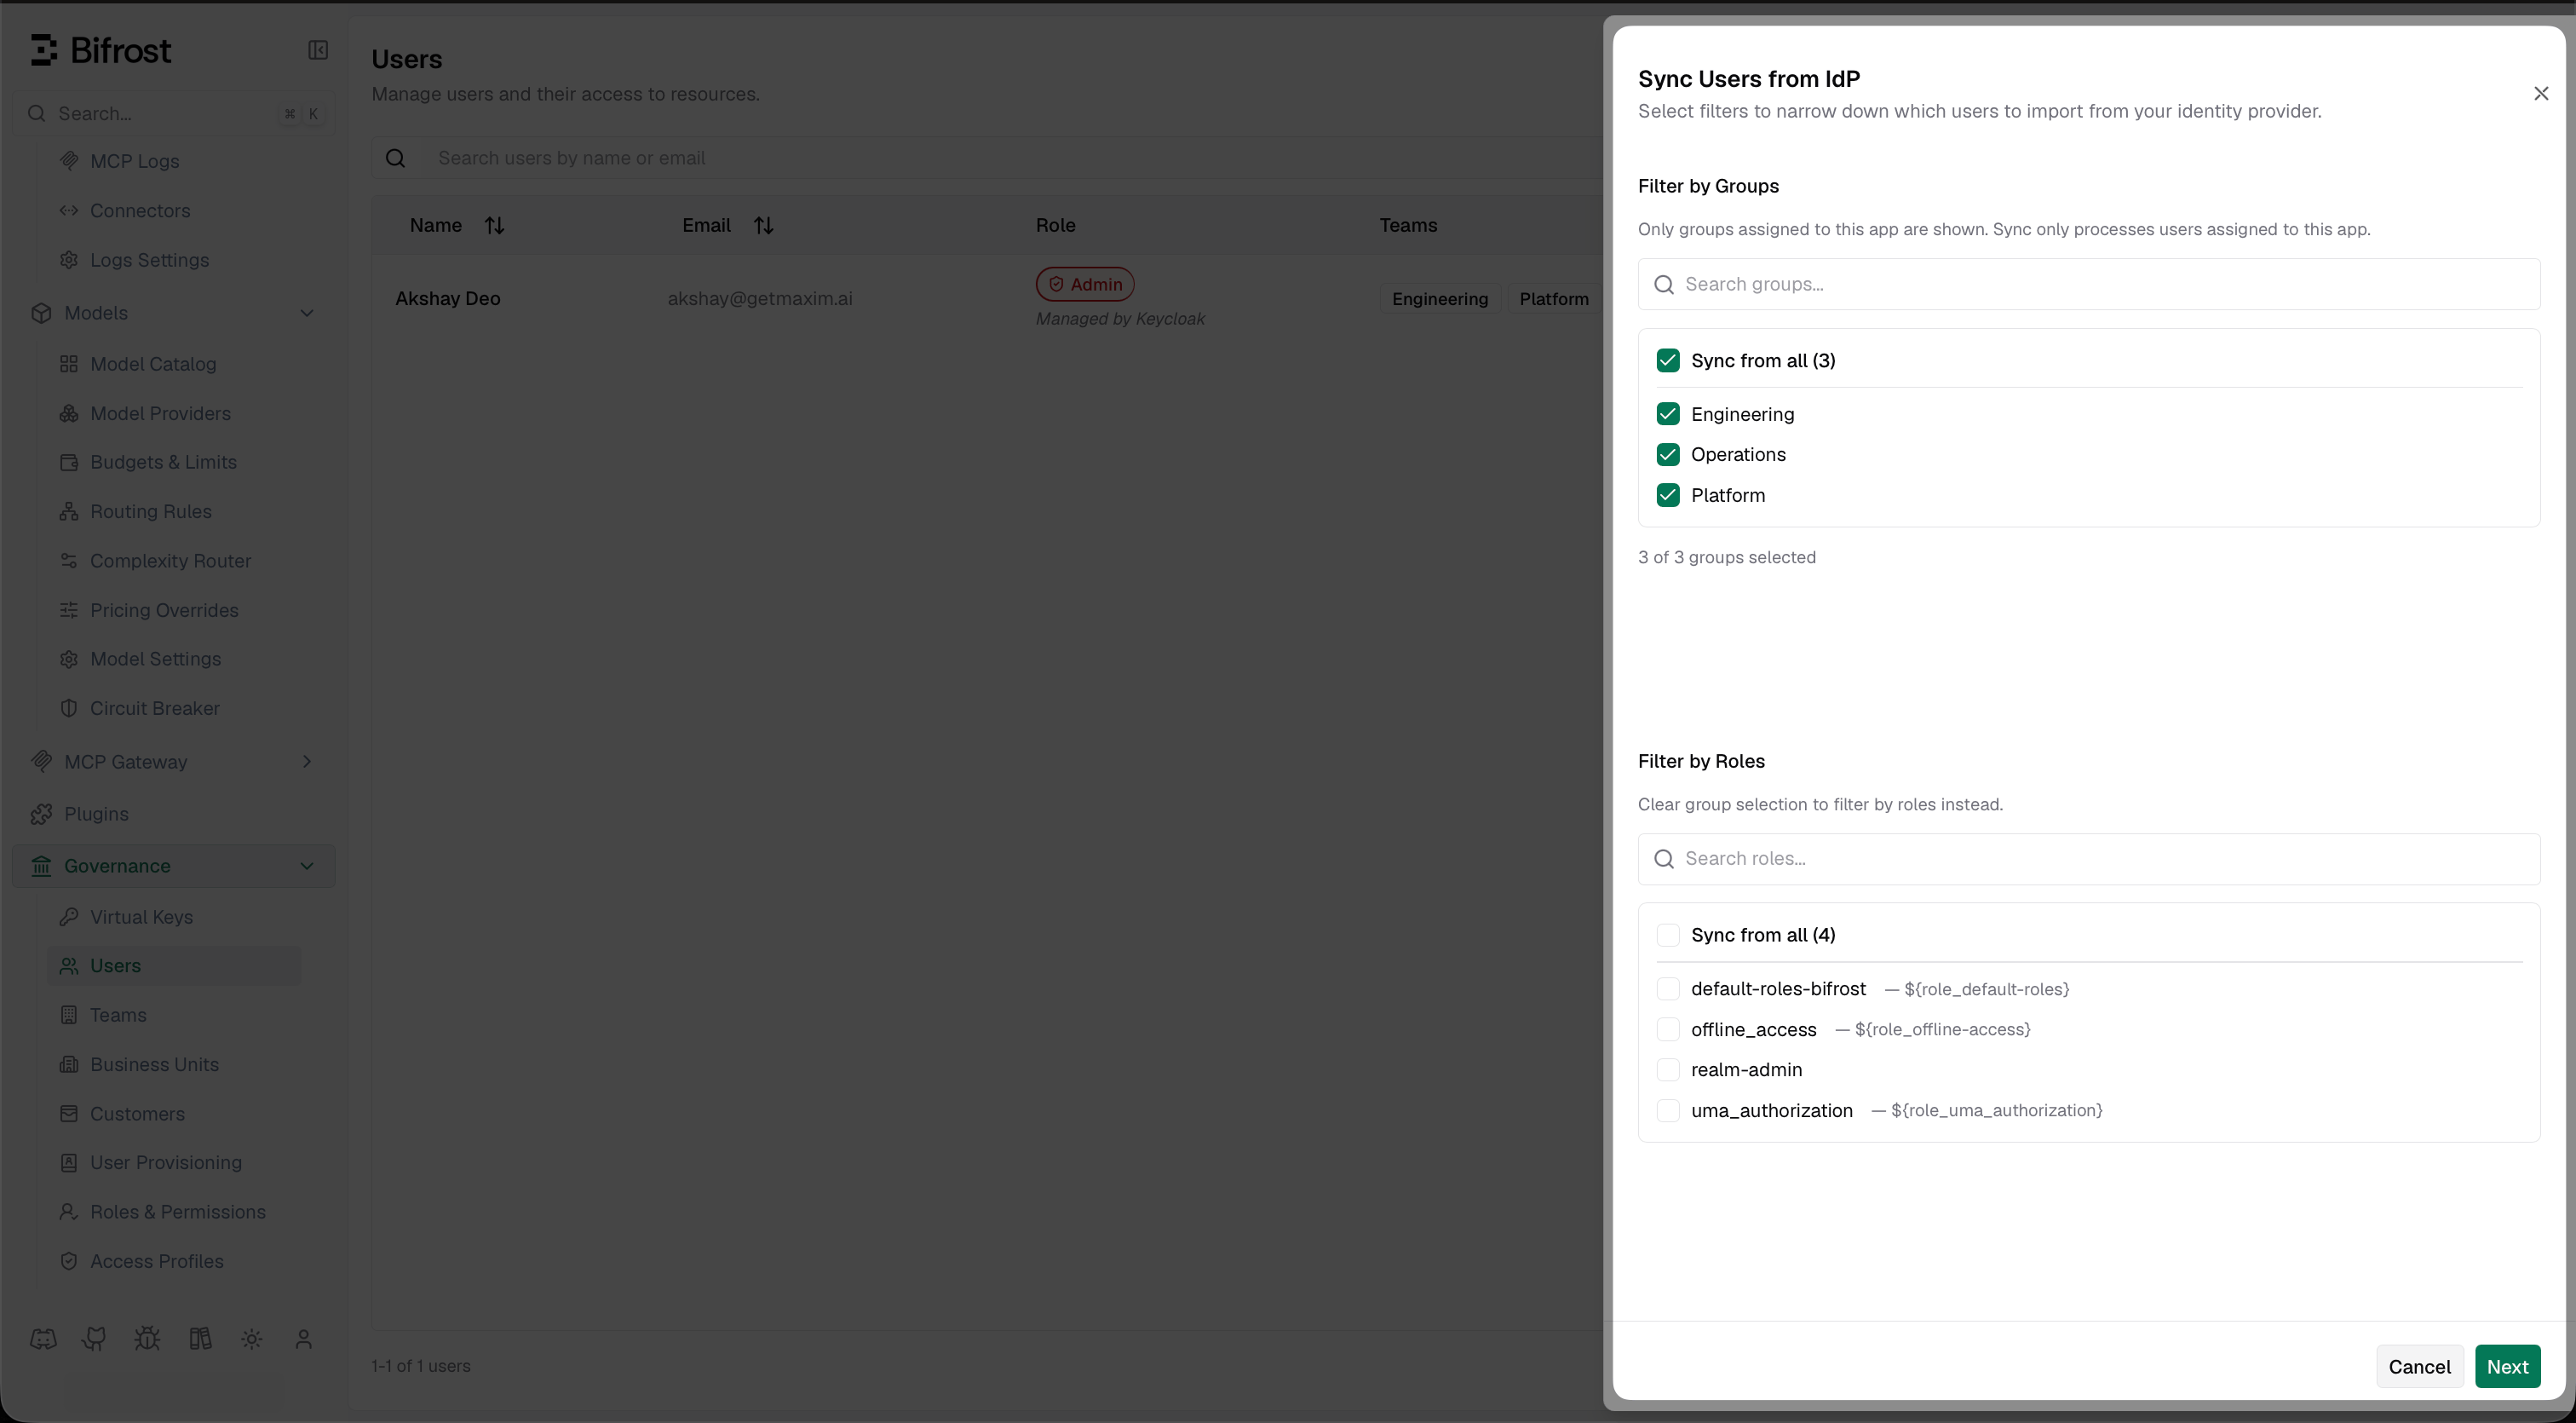
Sync Users from Keycloak - filter by group membership or realm role to select which users to import into Bifrost.
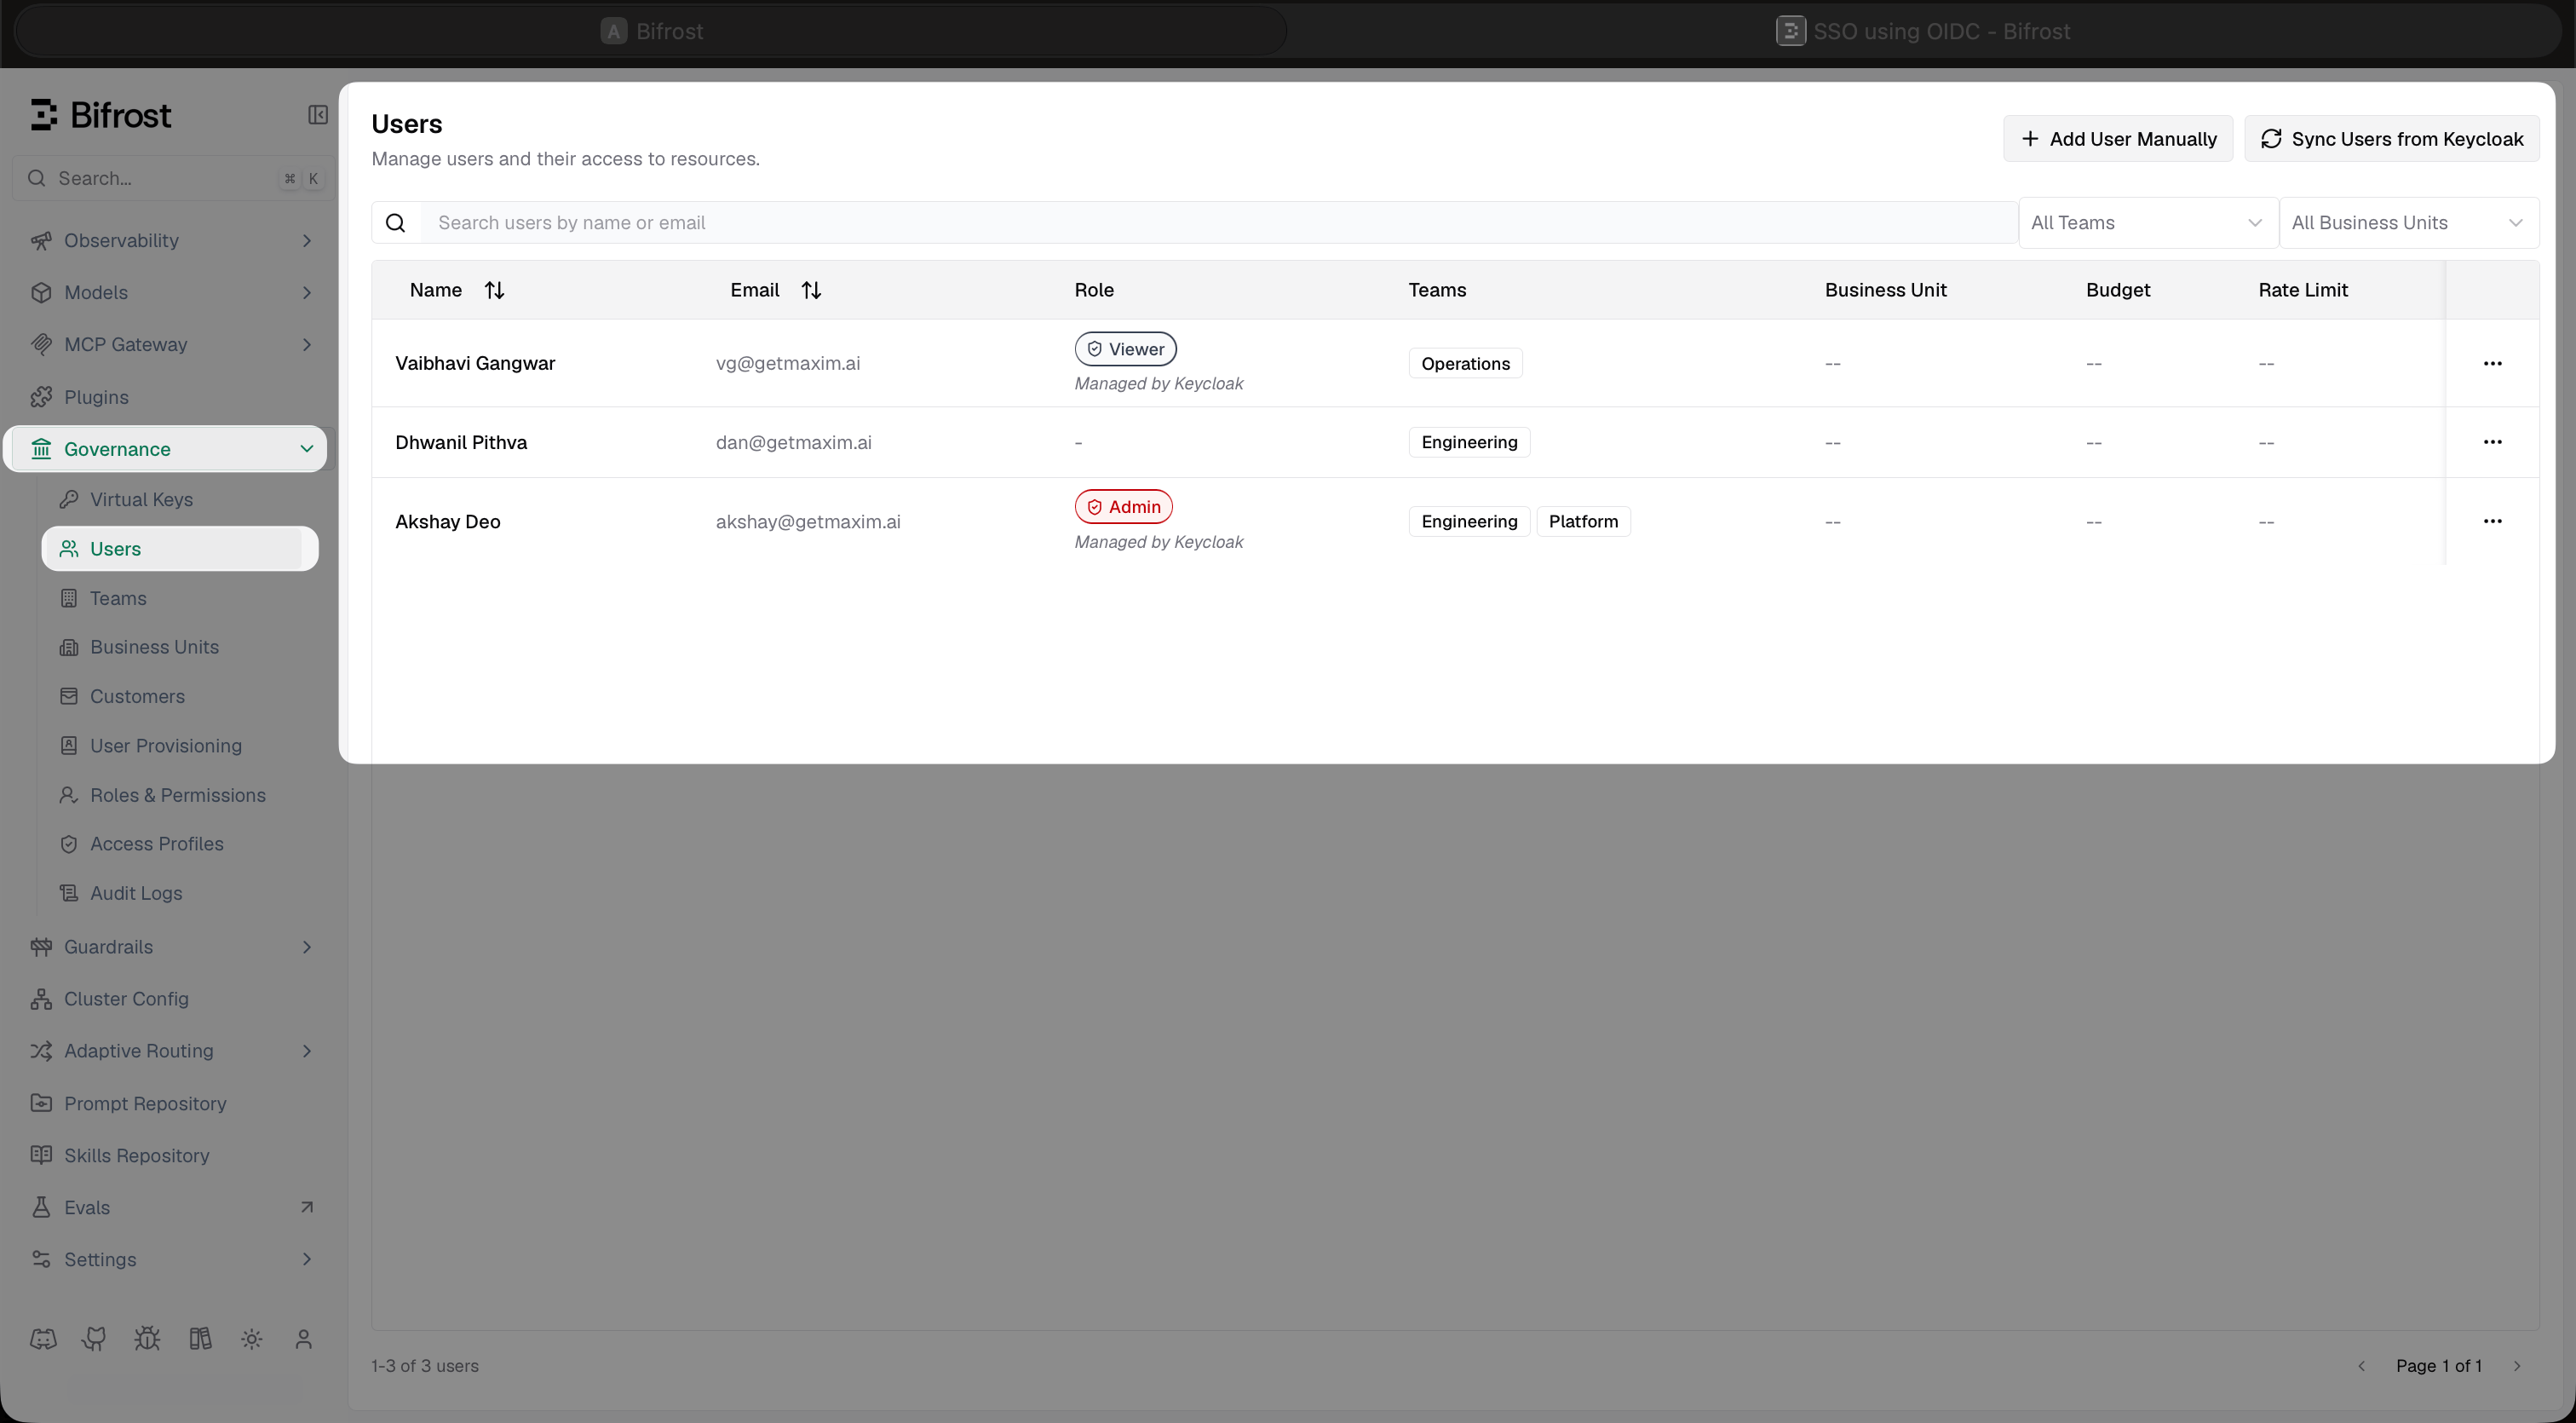
Users page after syncing - users are marked Managed by Keycloak and receive their roles and teams from the attribute mappings.
Troubleshooting
serverUrl must not include /realms/{realm} - the Server URL field takes the base Keycloak URL only. Set the realm separately in the Realm field. Example: https://keycloak.company.com + Realm Bifrost - not https://keycloak.company.com/realms/Bifrost.
Users are redirected back to login - confirm the client’s Valid redirect URIs exactly match your Bifrost login URL (trailing slash matters). Verify the client is Enabled in Keycloak.
Roles not appearing in the token - check that the User Realm Role mapper adds to both ID and access tokens. Use Evaluate on the client scope in Keycloak to preview the token a specific user would receive.
Groups not appearing in the token - verify the Group Membership mapper has Full group path enabled and is added to ID token, access token, and userinfo.
jwks keys not found - confirm the Server URL is reachable from Bifrost. The JWKS endpoint is {serverUrl}/realms/{realm}/protocol/openid-connect/certs.